December 29, 2013

How to build mbed src and Hello world (AMRCC, ARM GCC) (tutorial)

This tutorial is dedicated to building mbed sources and exporting hello world. K20D5M is going to be used as an example, because it is still not available in the mbed online compiler. Thus this give us to compile any application based on mbed libraries. My machine is running Windows so paths presented in the 2nd step are for windows.

1. Download the mbed github repository

If you are familiar with git, just clone repository using git clone command. For those who don't use git, download the repository as archive (zip).
Link mbed src ZIP archive (~5MB) [github.com/mbedmicro/mbed]

After downloading is completed, unzip the archive.

2. Set your toolchain paths

There few toolchains which can be used, I'll present ARM GCC and ARMCC (uVision). Create a new file named private_settings.py in the workspace_tools directory. This private settings file defines settings which overrides default settings.

from os.path import join
#KEIL
ARM_PATH = "C:/Keil/ARM"
ARM_BIN = join(ARM_PATH,"ARMCC","bin")
ARM_INC = join(ARM_PATH,"RV31","INC")
ARM_LIB    = join(ARM_PATH,"ARMCC","lib")
ARM_CPPLIB = join(ARM_PATH, "ARMCC","lib","cpplib")

#GCC ARM
GCC_ARM_PATH = "C:/Program Files/GNU Tools ARM Embedded/4.7 2013q3/bin"

BUILD_OPTIONS = ["debug-info"]

ARM_ paths are used for ARMCC (uVision IDE, paths for each folders might vary, as I had problems with previous versions, because they changed the folder structure), GCC_ARM_ path for ARM GCC toolchain path. Set those according your installation folder.
I use debug-info build-option, to include debug symbols.

3. Build sources for your target

To build mbed sources for TARGET and TOOLCHAIN, use command:
python build.py -m TARGET -t TOOLCHAIN

The list of supported targets is quite long, to check if your TARGET is supported TARGETS array [github.com/mbedmicro/mbed].
Each TARGET defines supported TOOLCHAIN. For example, K20D5M has ARM and GCC_ARM.

To build for ARM (that's ARMCC used in uVision for example)
python build.py -m K20D5M -t ARM

To build for GCC ARM
python build.py -m K20D5M -t GCC_ARM

If you just invoke command without -t, the target will be built for all supported toolchains.

4. Using exporters

As soon as you have built mbed sources for your target, go to my previous tutorial about using exporters. There is just shown to export Hello world example.

How to use mbed exporters

5. Build an application

Using ARM GCC, use makefile to build an application. If uVision is used, build the application in the uVision IDE. No matter what toolchain you use, they should generate a binary file, which can be copied to mbed msd drive. Same procedure as it's used by the mbed online compiler.

December 28, 2013

FRDM KL05, FRDM K20D50M testing for mbed enablement

Is anybody out there who wants to participate in enabling those 2 platforms? I posted instructions how to debug KL05Z target offline with mbed sources few weeks ago. However, I did not receive any feedback if that is working for you or any problems with its implementation.

The fresh new target K20D50M is still not complete, thus needed some more tweaks to complete its implementation.

Here's a post from mbed, good place to start:  Let's enable KL05Z and K20D5M targets online on mbed [mbed.org/forum/mbed]
Leave a comment, preferably there on mbed community.

December 26, 2013

How to use mbed exporters (tutorial)

I always created my own projects while I was developing offline with mbed. Fortunately, there are exporters which I assume are used in the online compiler. They are available in the mbed sources, in the folder /workspace_tools/export, Github mbed - export folder [github.com/mbedmicro/mbed]

These exporters support more platforms than online compiler, thus if you see a platform in the mbed sources but is not yet available online, this is your chance to start using your target. It requires IDE or at least a toolchain to compile it.

What targets are currently supported by exporters?
  • NUCLEO_F103RB
  • KL25Z,
  • LPC1347
  • LPC11U24_301
  • LPC4330_M4
  • nRF51822,
  • LPC11U35_401
  • LPC810
  • KL46Z
  • LPC812
  • KL05Z
  • LPC1768
  • K20D5M
  • LPC4088
  • LPC11C24
  • MBED_MCU
  • LPC1114
  • LPC11U24,
  • STM32F407
  • LPC2368

To see what options are available, invoke project.py, an output:

d:\Code\git_repo\github\mbed\workspace_tools>python project.py


[ERROR] You have to specify one of the following tests:
[ 0] MBED_A1: Basic
[ 1] MBED_A2: semihost file system
[ 2] MBED_A3: C++ STL
[ 3] MBED_A4: I2C TMP102
[ 4] MBED_A5: DigitalIn DigitalOut
[ 5] MBED_A6: DigitalInOut
[ 6] MBED_A7: InterruptIn
[ 7] MBED_A8: Analog
[ 8] MBED_A9: Serial Echo at 115200
[ 9] MBED_A10: PortOut PortIn
[ 10] MBED_A11: PortInOut
[ 11] MBED_A12: SD File System
[ 12] MBED_A13: I2C MMA7660
[ 13] MBED_A14: I2C Master
[ 14] MBED_A15: I2C Slave
[ 15] MBED_A16: SPI Master
[ 16] MBED_A17: SPI Slave
[ 17] MBED_A18: Interrupt vector relocation
[ 18] MBED_A19: I2C EEPROM read/write test
[ 19] MBED_A20: I2C master/slave test
[ 20] MBED_A21: Call function before main (mbed_main)
[ 21] MBED_A22: SPIFI for LPC4088 (test 1)
[ 22] MBED_A23: SPIFI for LPC4088 (test 2)
[ 23] MBED_A24: Serial echo with RTS/CTS flow control
[ 24] BENCHMARK_1: Size (c environment)
[ 25] BENCHMARK_2: Size (float math)
[ 26] BENCHMARK_3: Size (printf)
[ 27] BENCHMARK_4: Size (mbed libs)
[ 28] BENCHMARK_5: Size (all)
[ 29] MBED_1: I2C SRF08
[ 30] MBED_2: stdio
[ 31] MBED_3: PortOut
[ 32] MBED_4: Sleep
[ 33] MBED_5: PWM
[ 34] MBED_6: SW Reset
[ 35] MBED_7: stdio benchmark
[ 36] MBED_8: SPI
[ 37] MBED_9: Sleep Timeout
[ 38] MBED_10: Hello World
[ 39] MBED_11: Ticker
[ 40] MBED_12: C++
[ 41] MBED_13: Heap & Stack
[ 42] MBED_14: Serial Interrupt
[ 43] MBED_15: RPC
[ 44] MBED_16: RTC
[ 45] MBED_17: Serial Interrupt 2
[ 46] MBED_18: Local FS Directory
[ 47] MBED_19: SD FS Directory
[ 48] MBED_20: InterruptIn 2
[ 49] MBED_21: freopen Stream
[ 50] MBED_22: Semihost
[ 51] MBED_23: Ticker 2
[ 52] MBED_24: Timeout
[ 53] MBED_25: Time us
[ 54] MBED_26: Integer constant division
[ 55] MBED_27: SPI ADXL345
[ 56] MBED_28: Interrupt chaining (InterruptManager)
[ 57] MBED_29: CAN network test
[ 58] MBED_30: CAN network test using interrupts
[ 59] MBED_31: PWM LED test
[ 60] CMSIS_RTOS_1: Basic
[ 61] CMSIS_RTOS_2: Mutex
[ 62] CMSIS_RTOS_3: Semaphore
[ 63] CMSIS_RTOS_4: Signals
[ 64] CMSIS_RTOS_5: Queue
[ 65] CMSIS_RTOS_6: Mail
[ 66] CMSIS_RTOS_7: Timer
[ 67] CMSIS_RTOS_8: ISR
[ 68] RTOS_1: Basic
[ 69] RTOS_2: Mutex
[ 70] RTOS_3: Semaphore
[ 71] RTOS_4: Signals
[ 72] RTOS_5: Queue
[ 73] RTOS_6: Mail
[ 74] RTOS_7: Timer
[ 75] RTOS_8: ISR
[ 76] RTOS_9: File
[ 77] NET_1: TCP client hello world
[ 78] NET_2: UDP client hello world
[ 79] NET_3: TCP echo server
[ 80] NET_4: TCP echo client
[ 81] NET_5: UDP echo server
[ 82] NET_6: UDP echo client
[ 83] NET_7: HTTP client
[ 84] NET_8: NTP client
[ 85] NET_9: Multicast Send
[ 86] NET_10: Multicast Receive
[ 87] NET_11: Broadcast Send
[ 88] NET_12: Broadcast Receive
[ 89] NET_13: TCP client echo loop
[ 90] UB_1: u-blox USB modem: HTTP client
[ 91] UB_2: u-blox USB modem: SMS test
[ 92] USB_1: Mouse
[ 93] USB_2: Keyboard
[ 94] USB_3: Mouse_Keyboard
[ 95] USB_4: Serial Port
[ 96] USB_5: Generic HID
[ 97] USB_6: MIDI
[ 98] USB_7: AUDIO
[ 99] CMSIS_DSP_1: FIR
[100] DSP_1: FIR
[101] KL25Z_1: LPTMR
[102] KL25Z_2: PIT
[103] KL25Z_3: TSI Touch Sensor
[104] KL25Z_4: RTC
[105] KL25Z_5: MMA8451Q accelerometer
[106] EXAMPLE_1: /dev/null
[107] EXAMPLE_2: FS + RTOS


Usage: project.py [options]

Options:
-h, --help show this help message and exit
-m MCU, --mcu=MCU generate project for the given MCU (NUCLEO_F103RB, KL25Z,
LPC1347, LPC11U24_301, LPC4330_M4, nRF51822,
LPC11U35_401, LPC810, KL46Z, LPC812, KL05Z, LPC1768,
K20D5M, LPC4088, LPC11C24, MBED_MCU, LPC1114, LPC11U24,
STM32F407, LPC2368)
-p PROGRAM The index of the desired test program: [0-107]
-i IDE The target IDE: ['ds5_5', 'gcc_arm', 'codered',
'codesourcery', 'uvision', 'iar']
-b Use the mbed library build, instead of the sources

The output provides all information which we need to build a project. As I pushed today K20D5M target to mbed repository, I'll take that as an example how to start with mbed target which is not yet supported in the mbed compiler.
If you don't have prebuilt mbed sources for your target, don't use -b option (you can use it if you have built your target previously, then it creates the mbed library, same output as from the online compiler exporter). If you have not built target sources, use -b option, error is shown.

The very first application we can build is Hello world ([ 38] MBED_10: Hello World) To build it for GCC ARM, invoke:

python project.py -m K20D5M -p 38 -i gcc_arm

If you receive an error which contains jinja2, that means the projects generators require jinja2 package, please add it to your python installation. Easy install can help you, for more help, a procedure Jinja2 windows - how to install [forums.udacity.com/questions]

The output should be many compiled files, at the end [OK]. In the mbed root directory, there's should be a new folder build. Inside in the path build/export/workspace are sources which were copied there by an exporter. In the build/export folder, should be located an archive MBED_10_GCC_ARM_K20D5M.zip
This archive contains the exported application, unzip it , invoke make command to build Hello world application.

Freescale K20D50M (Target K20D5M) was added to mbed sources (news)

I have added another Freescale target to mbed github repository, this time it's the first Freescale Cortex M4 target.


I had pushed a branch which contains K20D5M target files, it was merged a minute ago to mbed master. It contains exporters for GCC ARM and uVision (ARMCC). I will add a new blog post how to use those exporters, it completely facilitates testing.

The K20D5M is supported, not fully functional. Demo like Hello world works, but for example I2C is not yet complete, neither PWM. Any help with this target is welcomed !

Update your K20D50M to CMSIS-DAP interface, which I shared on my mbed notepad, currently in beta version, link CMSIS-DAP K20D50M [mbed.org/users/Kojto/notebook]

If any questions, leave a comment or contact me on mbed. I will be working on this to complete entire HAL for K20D5M target.

December 19, 2013

debugging pyOCD gdb (tutorial)

I finally found a root cause of pyOCD locking kinetis chip. It took me quite a while to get into gdb server implementation, still many functions are unveiled for me. I am going to give you few tips what I would do once something is not working, or even to be sure that the right binary is going to be flashed. That's was my case, when I knew that pyOCD is flashing wrong data to the wrong address.

To start with, please if you use gdb server, change logging to DEBUG. This information is in gdb_test.py file.

logging.basicConfig(level=logging.DEBUG)

What helped me a lot to just see how data are interpreted, disable erasing the chip and then flashing as well. The code below is from gdbserver.py file. Don't forget, if you change anything inside pyOCD, please rerun setup.py file with a command

python setup.py install

Comment out two lines that init() and eraseALL().
if ops == 'FlashErase':
    self.flash.init()
    self.flash.eraseAll()
    return self.createRSPPacket("OK")

Flashing is carried out by calling programPage. Once you comment that line out, your target won't be flashed, so you can add a breakpoint anywhere there, write data to a file and see how they are interpreted.
while len(self.flashData) > 0:
    size_to_write = min(self.flash.page_size, len(self.flashData))
    #if 0 is returned from programPage, security check failed
    if (self.flash.programPage(flashPtr, self.flashData[:size_to_write]) == 0):
        logging.error("Protection bits error, flashing has stopped")
        return None
    flashPtr += size_to_write

    self.flashData = self.flashData[size_to_write:]

    # print progress bar
    sys.stdout.write('\r')
    i = int((float(flashPtr)/float(bytes_to_be_written))*20.0)
    # the exact output you're looking for:
    sys.stdout.write("[%-20s] %d%%" % ('='*i, 5*i))
    sys.stdout.flush()

There are many debug files commented in the implementation, which are intended for debugging purposes. The one below is from FlashDone command case, once you enable it, the bad_bin contains entire data which are going to be written to the flash. You can compare it to your bin generated, reveal if it matches the data.

elif 'FlashDone' in ops :
    flashPtr = 0
    bytes_to_be_written = len(self.flashData)

    """
    bin = open(os.path.join(parentdir, 'res', 'bad_bin.txt'), "w+")
    
    i = 0
    while (i < bytes_to_be_written):
        bin.write(str(self.flashData[i:i+16]) + "\n")
        i += 16
    """

How did I solve that problem with locking the chip? The most important addition is the security bits check, which is crucial. If data at the address 0x400 are not set to 0xFF, flashing should be stopped. If it would not be stopped, the chip can get secured, depending on the 16 byte value at that address.
I added the following lines, this is why debug logging is good to have enabled, you can see how those bits are set and are going to be flashed. This would have unveiled that chip is going to get locked.

def checkSecurityBits(self, address, data):
    #error if security bits have unexpected values
    if (address == 0x400):
        for i in range(12):
            logging.debug("data[%d] at add 0x%X: 0x%X", i, i, data[i])
            if (data[i] != 0xff):
                return 0

        logging.debug("data[%d] at add 0x%X: 0x%X", i+3, i+3, data[i+3])
        logging.debug("data[%d] at add 0x%X: 0x%X", i+4, i+4, data[i+4])
        if ((data[i+3] != 0xff) or (data[i+4] != 0xff)):
            return 0

    return 1

I even locked sometimes the chip (only security bit or some other bits, not mass erase bit). If chip is locked, mbed msd drive does not need to appear! Don't get frustrated. Follow the lines below, and you might get mbed drive again.
To solve this problem, get into bootloader mode (to disable CMSIS-DAP which enables another interface to access the mcu chip), use external jlink or just openSDA jlink. Execute the commands I shared in the previos post:
unlocking kinetis chip with jlink console [http://embeddedworldweb.blogspot.com]
Don't be afraid if it returns error, sometimes it does but chip is functional again. Just reconnect your board, mbed drive should appear again if the chip is not bricked (like mass erase bit is set).

To get familiar with gdb serial protocol, this link helps
GDB Remote serial protocol [www.embecosm.com/appnotes/]

I will add more chips to pyOCD. Finding the root cause of locking the kinetis chip provided a really appreciated lesson. Happy to contribute to pyOCD.

Side note: the security check is on my branch at the moment - waiting for merge to the master branch. Don't use KL25Z with pyOCD from the origin master at the moment! You can lock your chip. Thanks for understanding.
To test the above features, here's link to my branch  dev issue#1 - security bits check [github.com/0xc0170]

December 13, 2013

KL46Z CMSIS-DAP update - beta version 2 (news)

Some of you might have noticed that KL46Z was stripped from platforms. Wonder why?

The CMSIS-DAP interface was functional. However, it sets randomly the security bit or even disabled mass erase bit. With help from the mbed team, we corrected it.

I updated my notepad page on mbed, the CMSIS-DAP v2 for KL46Z is shared there.
CMSIS-DAP for the freedom platform [mbed.org/users/Kojto/notebook]

December 11, 2013

The freedom KL46Z online on mbed (news)

Today is a day full of updates since the morning. Another great news for us, mbed geeks. The freedom board KL46Z is among enabled mbed platforms, the second freedom platform.

Link: FRDM-KL46Z [http://mbed.org/handbook]


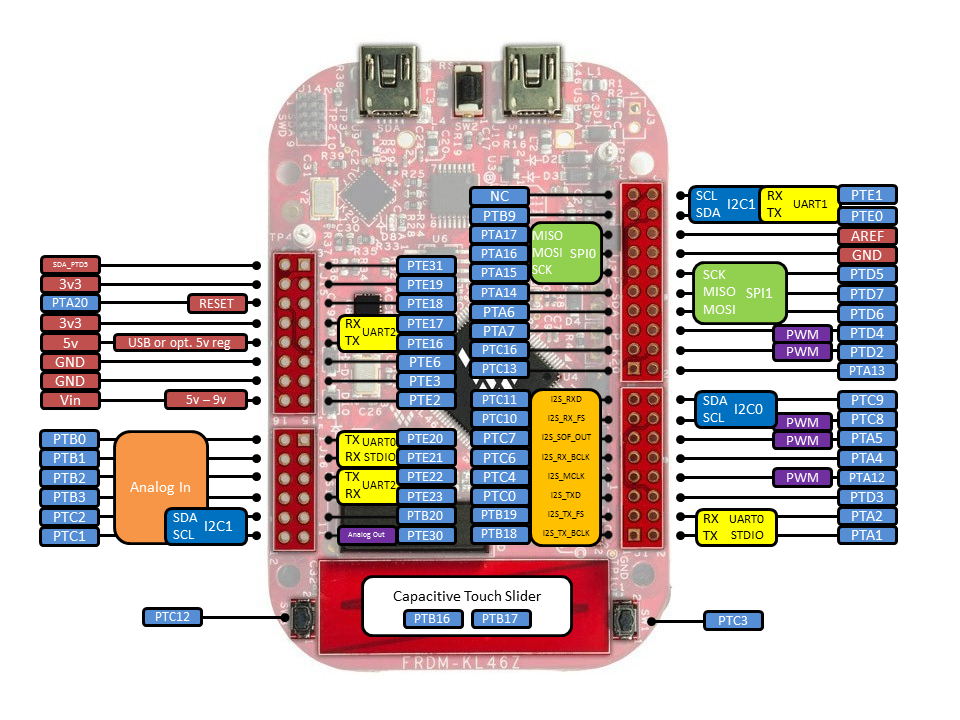
Here's a picture, directly from mbed handbook for KL46Z, with all needed pins description.

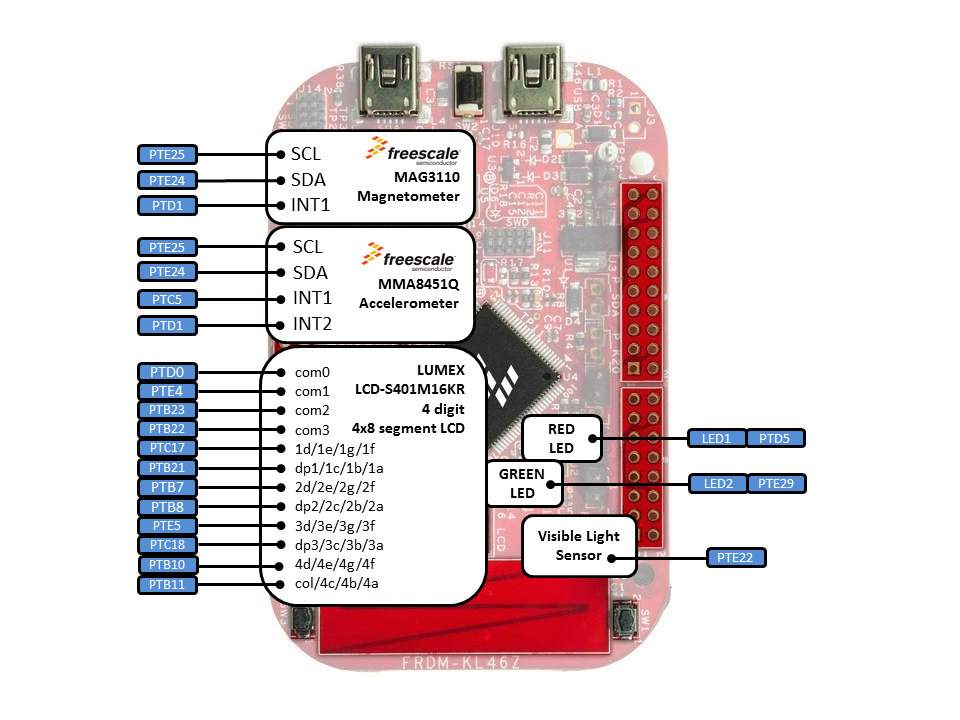
The second picture shows how are sensors connected,
Looks as good, doesn't it? Thanks to mbed for this descriptive pictures!

I have added exporters for uVision and GCC yesterday, got merged today to master.

Thanks to Michael Conners, who created the initial version of HAL for KL46Z. His pull request started my contribution to KL46Z HAL.

mbed KL25Z export to ARM GCC (news)

The export for target KL25Z to GCC ARM is available !!


Please share !

December 10, 2013

kinetis lxx gpio demo for the freedom platform (update)

Quick update.
I introduced yesterday KLxx project with only one freedom board supported - KL25Z.

I have added 3 more boards - KL02Z, KL05Z and KL46Z. Current version is v0.3. As version states, still needs more testing.

On github: Kinetis KLxx gpio demo - GCC [github.com/0xc0170]

December 9, 2013

The freedom platform ARM GCC basic project (news)

I created gcc projects for K20/K60 back in the March this year. I finally realized I could update my makefile and startups for CMSIS files and of course, for the freedom platform. Time's up!

The initial version contains the gpio demo for the FRDM-KL25Z. Here's the link Kinetis L ARM GCC demo using CMSIS files [github.com/0xc0170]

If you have any problems, questions, leave a comment as usual. I will add more freedom platform by time.

December 4, 2013

CMSIS-DAP for the freedom platform (news)

As many of you know, I recently added new freedom platforms to CMSIS-DAP, with help from the mbed team and also bigarmer2013.

I built today the CMSIS-DAP for the following boards:
  • KL05Z
  • KL25Z
  • KL46Z
  • K20D50M
You can download them here CMSIS-DAP for the freedom platform [mbed.org/users/Kojto/notebook]

Be aware, they are for testing purposes at the moment

If you have any problems, report them on mbed site, preferably in the notebook comments. EnjoY!

December 3, 2013

unlocking kinetis (KL25Z) with the jlink console

I locked my KL25Z board using pyOCD gdb yesterday, was not able to connect to the chip with ULINK, neither with CMSIS-DAP interface on KL25Z (K20). Because I am using older bootloader on openSDA interface, the board does not recognize jlink openSDA binary file. The only option left for me was to test it with an external jlink. So you need an external jlink to follow. I am not aware that ulink can do this. If you are, leave a comment!

To start with this, enter to the bootloader mode, if you are using openSDA hardware interface. So no any other interface is active which would block an access to the target.

I connected my jlink to it, shown error while connecting to the chip. Usually when I locked kinetis chip, at least jlink was able to connect to MCU. This time I assumed the mass erase protection bit was set. Thus I followed just simple steps find out what is the state of my core. I got lucky, the mass erase bit was not set, jlink was able to unlock the kinetis. If mass erase bit is set, it would fail. I accidentally selected KL26Z chip.

SEGGER J-Link Commander V4.76f ('?' for help)
Compiled Sep 27 2013 16:54:08
DLL version V4.76f, compiled Sep 27 2013 16:53:51
Firmware: J-Link Lite-FSL V1 compiled Jun 25 2012 16:40:07
Hardware: V1.00
S/N: 361000149
VTarget = 2.874V
Info: Could not measure total IR len. TDO is constant high.
No devices found on JTAG chain. Trying to find device on SWD.
Info: Found SWD-DP with ID 0x0BC11477

****** Error: Error while identifying Cortex-M core.
Info: Found SWD-DP with ID 0x0BC11477
No device found on SWD.
Failed to identify target. Trying again with slow (4 kHz) speed.
Info: Could not measure total IR len. TDO is constant high.
No devices found on JTAG chain. Trying to find device on SWD.
Info: Found SWD-DP with ID 0x0BC11477

****** Error: Error while identifying Cortex-M core.
Info: Found SWD-DP with ID 0x0BC11477
No device found on SWD.

J-Link>device ?
Info: Device "MKL26Z128XXX4" selected (128 KB flash, 16 KB RAM).
Reconnecting to target...
Info: Could not measure total IR len. TDO is constant high.
J-Link>unlock kinetis
Unlocking device...O.K.
J-Link>SWDReadAP 0x1000000
Read AP register 16777216 = 0x00000000
J-Link>SWDReadAP 0x1000000
Read AP register 16777216 = 0x00000031
J-Link>erase
Info: Found SWD-DP with ID 0x0BC11477
Info: Found Cortex-M0 r0p0, Little endian.
Info: FPUnit: 2 code (BP) slots and 0 literal slots
Info: Kinetis L-series (setup): Disabling watchdog.
Erasing device (MKL26Z128xxx4)...
Info: J-Link: Flash download: Flash programming performed for 1 range (1024 byte
s)
Info: J-Link: Flash download: Total time needed: 1.086s (Prepare: 0.465s, Compar
e: 0.143s, Erase: 0.017s, Program: 0.047s, Verify: 0.012s, Restore: 0.399s)
Erasing done.
J-Link>

To read further about MDM-AP Control register (check the output SWDReadAP), see chapter 9.3.1 MDM-AP Control Register where all bits are described.

Update1:
I am testing the KL46Z interface, got locked today, but was not able to revive it with the same procedure as above, unlocking failed firstly. I invoked erase, passed with a error, and the unlock. My chip is again alive!

SEGGER J-Link Commander V4.76f ('?' for help)
Compiled Sep 27 2013 16:54:08
DLL version V4.76f, compiled Sep 27 2013 16:53:51
Firmware: J-Link Lite-FSL V1 compiled Jun 25 2012 16:40:07
Hardware: V1.00
S/N: 361000149
VTarget = 3.280V
Info: Could not measure total IR len. TDO is constant high.
No devices found on JTAG chain. Trying to find device on SWD.
Info: Found SWD-DP with ID 0x0BC11477

****** Error: Error while identifying Cortex-M core.
Info: Found SWD-DP with ID 0x0BC11477
No device found on SWD.
Failed to identify target. Trying again with slow (4 kHz) speed.
Info: Could not measure total IR len. TDO is constant high.
No devices found on JTAG chain. Trying to find device on SWD.
Info: Found SWD-DP with ID 0x0BC11477

****** Error: Error while identifying Cortex-M core.
Info: Found SWD-DP with ID 0x0BC11477
No device found on SWD.
J-Link>device ?
Info: Device "MKL46Z256XXX4 (ALLOW SECURITY)" selected (256 KB flash, 32 KB RAM)
.
Reconnecting to target...
Info: Could not measure total IR len. TDO is constant high.
J-Link>unlock kinetis
Unlocking device...Timeout while unlocking device.
J-Link>unlock kinetis
Unlocking device...Timeout while unlocking device.
J-Link>unlock kinetis
Unlocking device...Timeout while unlocking device.
J-Link>erase
Info: Found SWD-DP with ID 0x0BC11477

****** Error: Kinetis (connect): Timeout while halting CPU. CPU does not stop.
Erasing device (MKL46Z256xxx4 (allow security))...
Info: Found SWD-DP with ID 0x0BC11477
Info: Found Cortex-M0 r0p0, Little endian.
Info: FPUnit: 2 code (BP) slots and 0 literal slots
Info: Kinetis L-series (setup): Disabling watchdog.
Info: J-Link: Flash download: Flash programming performed for 1 range (1024 byte
s)
Info: J-Link: Flash download: Total time needed: 1.173s (Prepare: 0.481s, Compar
e: 0.245s, Erase: 0.016s, Program: 0.001s, Verify: 0.010s, Restore: 0.417s)
Erasing done.
J-Link>unlock kinetis
Unlocking device...O.K.
J-Link>

December 2, 2013

pyOCD (gdb) and KL25Z

As I wrote yesterday, that everything was working, I run today directly gdb, using elf file. The result? KL25Z got locked, can't flash it anyhow. Need to replace the chip and look into the gdb server implementation, why it caused locking the chip. This confirmed what users reported on mbed site, that it locks the chip.

Here's an output:


Readelf returns from application elf file (simple gpio demo which I used yesterday, but bin file created from this elf file):

ELF Header:
  Magic:   7f 45 4c 46 01 01 01 00 00 00 00 00 00 00 00 00
  Class:                             ELF32
  Data:                              2's complement, little endian
  Version:                           1 (current)
  OS/ABI:                            UNIX - System V
  ABI Version:                       0
  Type:                              EXEC (Executable file)
  Machine:                           ARM
  Version:                           0x1
  Entry point address:               0xc1
  Start of program headers:          52 (bytes into file)
  Start of section headers:          111732 (bytes into file)
  Flags:                             0x5000002, has entry point, Version5 EABI
  Size of this header:               52 (bytes)
  Size of program headers:           32 (bytes)
  Number of program headers:         5
  Size of section headers:           40 (bytes)
  Number of section headers:         23
  Section header string table index: 20

Section Headers:
  [Nr] Name              Type            Addr     Off    Size   ES Flg Lk Inf Al
  [ 0]                   NULL            00000000 000000 000000 00      0   0  0
  [ 1] .isr_vector       PROGBITS        00000000 008000 0000f4 00  AX  0   0  4
  [ 2] .flash_protect    PROGBITS        00000400 008400 000010 00   A  0   0  1
  [ 3] .text             PROGBITS        00000410 008410 006818 00  AX  0   0  8
  [ 4] .ARM.exidx        ARM_EXIDX       00006c28 00ec28 000008 00  AL  3   0  4
  [ 5] .data             PROGBITS        1ffff0c0 00f0c0 0000dc 00  WA  0   0  4
  [ 6] .bss              NOBITS          1ffff19c 00f19c 000154 00  WA  0   0  4
  [ 7] .heap             PROGBITS        1ffff2f0 00f1a0 000080 00      0   0  8
  [ 8] .stack_dummy      PROGBITS        1ffff2f0 00f220 000080 00      0   0  8
  [ 9] .ARM.attributes   ARM_ATTRIBUTES  00000000 00f2a0 000028 00      0   0  1
  [10] .comment          PROGBITS        00000000 00f2c8 0000e0 01  MS  0   0  1
  [11] .debug_info       PROGBITS        00000000 00f3a8 00579f 00      0   0  1
  [12] .debug_abbrev     PROGBITS        00000000 014b47 0011c7 00      0   0  1
  [13] .debug_loc        PROGBITS        00000000 015d0e 000e8a 00      0   0  1
  [14] .debug_aranges    PROGBITS        00000000 016b98 000298 00      0   0  8
  [15] .debug_ranges     PROGBITS        00000000 016e30 0002d0 00      0   0  8
  [16] .debug_line       PROGBITS        00000000 017100 0016d4 00      0   0  1
  [17] .debug_str        PROGBITS        00000000 0187d4 00184b 01  MS  0   0  1
  [18] .debug_frame      PROGBITS        00000000 01a020 0012f0 00      0   0  4
  [19] .stabstr          STRTAB          00000000 01b310 000076 00      0   0  1
  [20] .shstrtab         STRTAB          00000000 01b386 0000ed 00      0   0  1
  [21] .symtab           SYMTAB          00000000 01b80c 002730 10     22 439  4
  [22] .strtab           STRTAB          00000000 01df3c 000e64 00      0   0  1
Key to Flags:
  W (write), A (alloc), X (execute), M (merge), S (strings)
  I (info), L (link order), G (group), T (TLS), E (exclude), x (unknown)
  O (extra OS processing required) o (OS specific), p (processor specific)


Be warned !

November 28, 2013

pyOCD with KL25Z (introduction)

This is an introduction to pyOCD, my very first steps getting familiar with pyOCD. Two mbed users reported locking of their KL25Z chips with pyOCD. I hope we find out why!

The pyOCD used to be part of mbed github repository, but not anymore. It was separated, can be found here pyOCD repo [github.com/mbedmicro/pyOCD]. It has awesome readme file there, which serves as documentation.

the official mbed page for pyOCD Debuging from GDB using pyOCD [mbed.org/blog].

I started with pywinusb (using windows on my laptop), installed via easy_install.


The second step was to build pyOCD, run from the pyOCD root directory python setup.py install.


Connect KL25Z to your PC, be certain it has mbed interface! Time to start gdb session, either gdb from toolchain or from pyOCD. I chose to run gdb_test.py which is in pyOCD/test folder.


KL25Z detected, presume to flashing part. To be save, I opened basic_test.py located in test directory and commented out line 156 flash.flashBinary(binary_file). This prevents from flashing (locking alert which I explain later).


Everything went ok according to the console, flashing was skipped though. Now return the line 156 to test flashing part. Have ready compiled GCC program (I use bin file from the example I created for mbed GCC KL25Z demo).

If you run it without arguments, the default path is /binaries/l1_target.bin, the name of bin file for KL25Z is l1_kl25z.bin . Flashing was successful but program was not running correctly and chip got to secured state. I restarted gdb test script, received an error. I opened uVision, it displays a warning that chip is locked, but not permanently, fortunately! I have to get my prototype board, to continue with testing.

I'll share more once I explore what's going on and why chip got locked once.

Update 1st of December:
I have been debugging it for a while, I added some extra code which completely messed connection to the chip, gdb returned error. Once I found out what I did wrong, everything seems to be functional.
Even flashing different binaries does not lock chip, still using pyOCD scripts, not directly its gdb implementation.


November 21, 2013

KL46Z and KL05Z boards have CMSIS-DAP interface (update)


I have spent my last evenings with CMSIS-DAP, mostly with the interface layer. There has been some motion in CMSIS-DAP recently. The master branch already contains these 2 interfaces.

After porting mbed SDK to those 2 freedom boards, this was on my todo list as a final step. They should be tested, both SDK and also CMSIS-DAP, then enabled on mbed. Can't wait to see these 2 boards online.

I can come back to the freedom board K20D50M and its mbed SDK implementation. Also what I would like to do, start with pyOCD.

November 13, 2013

CMSIS-DAP interface and porting the new boards (news)

The CMSIS-DAP interface was published by mbed team 2 weeks ago. Here's the link
CMSIS DAP [github.com/mbedmicro]

The handbook for mbed firmware can be found at cmsis-dap-interface-firmware [mbed.org/handbook] . It explains the file structure plus some basics, not detailed implementation though, which is actually crucial. I really appreciate what mbed does and the way they do! To open and share with us this interface, takes a lot of effort.

I decided this week, to get familiar with it, attempt to add HAL for the other freedom platforms which are already supported on mbed github (KL05Z, KL46Z). This is the last step (testing will be carried out anyway) to enable them online. They need the mbed interface!

KL05Z is the first one I started. However, the code is commented, but not everything is clear, I have to do lot of guessing.. Thus KL05Z flashing by bin is not working yet, it returns SWD error which I located where it fails, have to examine why it fails and do some corrections.

If I succeed, I can share the testing version of that interface.

One side note: ARM GCC export for KL25Z will be available online soon! Can't share more at the moment, but I will !

November 6, 2013

cc3000 mbed - EthernetInterface (update)

Quick update, what's going to come to the host driver for cc3000 on mbed. We have been fixing few issues in the driver and implemented the new API (just an extension of the current one) which is easier to use. And mostly users with mbed will be familiar with it, because lot of net drivers are using the same API.

I pushed all these changes today, slowly updating all examples, you can currently check this change in the hello world demo, ntp client demo. There's some clean-up to do as well. The constructor for cc3000 was changed. That was the only change which broke the previous code in all demos, sorry.

I will post some updates about the mbed, I have added few more things there for the freedom platform. Also I attended the mbed connect meeting in San Jose. More to come!

October 20, 2013

mbed GCC makefile v2.0 (update)

I updated my makefile for mbed. What does it bring new?

Not only defined for KL25Z as it was by default. I added a Platforms file where are all platforms I found supported in the mbed sources. All you need to do, choose your board.

Supported platforms:
  • KL05Z
  • KL25Z
  • KL46Z
  • LPC1768
  • LPC11U24
  • LPC11U24_301
  • LPC1347
  • LPC1114
  • LPC11C24
  • LPC11U35_401
  • STM32F407 
Link: mbed ARM GCC Makefile [github.com/0xc0170]

October 9, 2013

cc3000 driver on mbed (news)

As I wrote previously, we have been working on cc3000 driver which was released yesterday on mbed. It was about the time, I started to port C code to C++ back in August. I did not anticipate the chip is so complex.

Here's link to the cookbook cc3000 cookbook [http://mbed.org/cookbook]

I also published 11 examples ready to be used for any mbed platform available on mbed (2 boards have predefined init function, the others need to be added based on user's configuration). Mbed Socket interface is part of cc3000 driver which enables to use many ethernet libraries. To mention some HTTPclient, Twitter, Websockets.

I had so much fun with it, the most excited I was when tweet from my Wi-Go was published. Not to mention that this driver was also mentioned on adafruit blog : cc3000 for mbed [http://www.adafruit.com/blog/]
I hope that driver will help many people with IoT & mbed !

Does anybody need any tutorials about cc3000? How smartconfig works (and picture step-by-step guide for the Simple socket demo) ?
Or what about any missing demo for cc3000? Leave a comment.

October 5, 2013

mbed makefile for the freedom platform (update)

Those who use my makefile for freedom boards on mbed (KL25Z at the moment), please update if you want to have more flash available for your application.

Current makefile version is 1.2. 
Link: KL25Z makefile [https://github.com/0xc0170]

It was set previously that floating printf/scanf were included. I decided to comment that linker option out. The text size of mbed hello world which I used in the tutorials, went down from 26kB to 2.7kB.

For other freedom boards, you can use this makefile. I have been using it for KL46 (only to rename KL25Z to KL46Z), run without any problems.

I will add support of GCC for KL05Z soon.

October 4, 2013

More regular updates on Twitter

If you follow this blog and you actually find information here valuable, you might find also useful my twitter account where I twitt about my free-time activities which include mbed, the freedom platform, also any other activities.

Here's the link : https://twitter.com/0xc0170


September 29, 2013

mbed freedom KL46Z (update - testing phase)

I created a branch from mbed master, which contains KL46Z GCC ARM support.
KL46Z is similar to KL25Z. Be aware of their differences. KL46Z is bigger brother of KL25Z, it has on top of KL25Z features - I2S and LCD module. The memory footprint is also bigger (256mb flash, 32kb ram).

I officially started testing today, I made GCC running with my makefile few days ago. This time I took a look at MUX options in HAL layer and interrupts. Of course, there were problems I had to face.

I added KEIL (in mbed is named ARM). I met again with BKTP instruction in KEIL (heap was set to 0, as the last time), clock configuration was set to a wrong value. Consequently, timer's clock were not activated - no Ticker interrupt.

All this updates are currently on my branch, will be available soon.

September 28, 2013

TSS - Touch sensing (introduction)

There was a new TSS released in the beginning of this month, version 3.1. I'll describe the features I consider are important to highlight.

What's new?

  • supports TSI noise mode
  • new patented AFID keydetector - connected with the noise mode - noise robust (capable of passing EN 61000-4-6)
  • C++ wrapper

AFID + noise mode

The TSS noise mode is available only for Kinetis L. How does it work inside TSS?
The capacitive measurement is active RESPONSE TIME-1  number of an execution of TSS_Task. This implies that a noise is measured always once until the decision is made about the electrode status (touch/release). Since the moment, the noise is detected, the noise mode is active until there's no noise on any electrode.  Without any noise, TSS switches back to the capacitive measurement.
The example named TWRKXX_DEMO_EMC shows usage of AFID and the noise mode.

C++ wrapper

We added C++ wrapper for entire TSS which simplifies TSS usage. You still have to define system setup header file (that's how TSS was designed, I would like to change this). C++ supports all features which TSS provides.
There are 5 controls (as in TSS), one system and the control factory. I don't introduce callback's classes here.
TSS_System is a singleton, which takes care of TSS settings. If you don't want to use any control, system handles everything and you can retrieve informations which are available (like electrode status).
If you want to use controls, take a look at TSS_ControlFactory which facilitates creation of new controls. Doesn't need to be used.

The entire API contain doxygen comments. Open FRDMKLXX_DEMO_CPP example which is located in EXAMPLES folder to see how to create new control and register callback.

If you have any questions, don't hesitate to ask in comments here or on freescale community.

September 26, 2013

freedom KL46Z on mbed (update)

Perhaps you missed this, KL46Z was merged to mbed. A user Mike ported KL46Z which currently supports only ARM GCC. He was using a makefile and startup files which were written for KL25Z, I am feeling rewarded that it helped to port another platfrom!

I tested my GPIO mbed application which I shared for freedom KL25Z ARM GCC, with same makefile (not much changed). I was able to run it, debug it. I am going to add ARM compiler support and review the code.

Stay tuned, more freedom platforms are cominG!

September 20, 2013

mbed and cc3000 (wifi)

I share with you that we are currently working on new cc3000 driver directly aimed to be used with mbed and libraries shared there.

There are already at least 2 repositories which contain a host driver ported to mbed (written in C, mainly). Thus I began to write a new C++ interface, with a goal to be easier to use for mbed community. The host driver was ported a while ago, tested with 2 examples which were tested at least on 2 mbed platforms (I am using KL25Z - Wi-Go board). I decided to write more applications , while searching, I discovered the mbed socket interface. This is a priority at the moment, will enable users to use many libraries which are written using that interface.

I am not able to anticipate the release date at the moment. There's a lot of work still to do. Anybody out there interested ?

Want to join the development? Find me on mbed.org, send me a direct message there with your email. I'll share more details if requested.

September 13, 2013

mbed GCC with eclipse KL25Z (Part 2)

This is finally the debugging part which I described in one of my comments. There are at least 3 options to debug KL25Z with GCC:
CMSIS-DAP with openOCD, external Jlink or openSDA Jlink firmware.

CMSIS-DAP is still in a development, according to the site cmsis-dap: add initial cmsis-dap support [openocd.zylin.com]. Thus I went straight to Jlink's options. The last option is the most useful for many users. I will describe to process how to set it and be able to debug your KL25Z with no external parts needed.

1. step - download Jlink firmware
Visit a webpage SEGGER openSDA Jlink [http://www.segger.com], there are links on the bottom of the webpage. Be aware of some limitations which are stated there.

Download OpenSDA Jlink firmware http://www.segger.com/admin/uploads/userfiles/file/J-Link/JLink_OpenSDA.zip

2. step - get serial number of openSDA
Switch your KL25Z to the bootloader mode (unconnect usb, hold reset button, plug it back in while holding button, release button). Copy there unzipped file JLink_OpenSDA.sda
Restart the board, then plug it back to your PC.

In case you don't have installed jlink software (gdb, jlink console). Get this program from here which will display the serial number of your openSDA jlink in order to download the jlink software (you need jlink's serial number which we obviously don't know as we don't have external tool).

3. step - install JLink software
Download Jlink firmware here JLink software [http://www.segger.com]

This will install  Jlink configurator, check serial number, type it in the page pasted above and download jlink software.


After installing jlink software,  navigate to a jlink's folder in my case c:\Program Files\Segger\JLinkARM_V472a, open JLink.exe program. It will display this warning, check the below button, it won't display today, and press accept.

This should be an output if your board is connected and the jlink driver was installed properly:
 
Jlink is connected, we proceed to the eclipse project we created in part 1.

4. step - run jlink gdb server
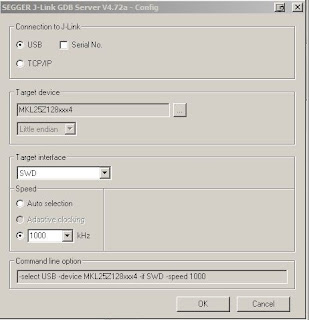
The program is located again in the Segger Jlink software folder, named JLinkGDBServer. Execute the program, it pops the config window, set it as it is shown on the picture:

Press OK and it should display the following lines

As you see, it's connected to my freedom board. Keep it running, we will connect to it once we complete debug settings in Eclipse.

5. step - set eclipse project
Before going further, your eclipse must have installed GDB Hardware Debugging plugin. If not, please find a tutorial how to install that plugin.

Open your mbed KL25Z project, select your project, click on the green bug (the top right corner on the picture) and select Debug configuration.
Click with your right mouse button on GDB Hardware Debugging, create New one

On the bottom of the window it is "Using GDB (DSF) Hardware .... Select other . Click on select other and we need to check button Use configuration specific and select Standard GDB Hardware

Now we are back in Debug configurations, select Debugger tab and fill details according to the picture below
The tab Startup needs this details
The first input window (Initialization Commands) contain on my side the following commands
target remote localhost:2331
monitor clrbp
monitor endian little
monitor speed 1000
monitor reset
monitor sleep 100
monitor speed auto


The last input window (Run Commands) (Note: I prefer to put a breakpoint in Reset_Handler)
break main
continue


I assume your jlink gdb server is running, click on the debug icon on the bottom of Debug configurations window.

This should be your window (breakpoint is set in main, thus it stops there).


Now led should be blinking.

The debugging part over ! There are tutorials how to work with gdb. If anything not correct, please use comments below or contact me on mbed. I'll add this to my notepad there.

September 12, 2013

How to flash/debug KL05 with mbed library offline in KEIL (tutorial)

Hello,

I finally allocated one evening to finish what I should have done earlier. I did not anticipate that at this time KL05 wouldn't be online on mbed (no mbed interface for this board yet). This is step guide how to debug it with free version of KEIL (I'll add ARM GCC later).

1. step - clone mbed git repository from github
mbed git repository is here mbed git repository [github.com]
If you don't use git, or github, download repository as zip file. This is crucial for offline debugging.

Create a new file named private_settings.py in mbed/workspace_tools. Put the following source code there (I am using KEIL 4.6 at the moment, KEIL seldomly changes their folder structure).


from os.path import join

ARM_PATH = "C:/Program Files/Keil/TAD/ARM"
ARM_BIN = join(ARM_PATH,"ARMCC","bin")
ARM_INC = join(ARM_PATH,"RV31","INC")
ARM_LIB    = join(ARM_PATH,"ARMCC","lib")
ARM_CPPLIB = join(ARM_PATH, "ARMCC","lib","cpplib")

BUILD_OPTIONS = ["debug-info"] 

Time to build our own mbed library, type on your command line python build.py -m KL05Z -t ARM from workspace_tool directory.

If everything went ok, the output should state Build successes: * ARM::KL05Z. Built library is now inside build folder (same level than workspace_tools and libraries folders).

2. step - create KEIL project

Create new folder (I name mine KL05_demo) and copy there entire folder mbed which is inside build directory. Open KEIL, select Project on the top toolbar and create a new project inside our new created directory. It asks you to choose a processor, MKL05Z32xxx4 is assembled on the freedom KL05Z.


Click OK, it ask if you want to copy startup file, click No. We don't need it. This should be an output inside the Project window

Remove that Source Group 1.

3. step - main code file
Create new main.cpp inside the project directory and paste there the simple demo. Here's my code:

#include "mbed.h"

DigitalOut myled(LED1);

int main() {
    while(1) {
        myled = 1;
        wait(0.2);
        myled = 0;
        wait(0.2);
    }
}

4. step - Set our new created project for KL05Z
The tab which we start with, it's User. Add there fromelf --bin -o test05_KL05Z.bin test05.axf
This step can be skipped because KL05Z does not have the mbed interface yet. Once it does, this command creates a .bin file which you can copy to a mbed drive.


5.step - C/C++ tab
Fill Define with
TARGET_KL05Z, NDEBUG, TOOLCHAIN_ARM, __CMSIS_RTOS, __CORTEX_M0PLUS

The include paths should contain folders (add folder with the first icon, a small rectangle):
mbed
mbed/TARGET_KL05Z
mbed/TARGET_KL05Z/TOOLCHAIN_ARM_STD

The misc Controls should contain --gnu command.

The asm tab should also have filled same Include Paths as C/C++. Copy them there.

6. step - Linker tab
Uncheck Memory Layout from Target Dialog. We need to add scatter file which is located inside mbed/TARGET_KL05/TOOLCHAIN_ARM_STD, named MKL05Z4.sct. Add it there.
This is what it should display : .\mbed\TARGET_KL05Z\TOOLCHAIN_ARM_STD\MKL05Z4.sct

Add precompiled mbed files to Misc controls which is right below Scatter file:
mbed/TARGET_KL05Z/TOOLCHAIN_ARM_STD/sys.o
mbed/TARGET_KL05Z/TOOLCHAIN_ARM_STD/retarget.o
mbed/TARGET_KL05Z/TOOLCHAIN_ARM_STD/cmsis_nvic.o
mbed/TARGET_KL05Z/TOOLCHAIN_ARM_STD/system_MKL05Z4.o
mbed/TARGET_KL05Z/TOOLCHAIN_ARM_STD/startup_MKL05Z4.o
mbed/TARGET_KL05Z/TOOLCHAIN_ARM_STD/mbed.ar

7. step - Debug tab
Now select the right radio button Use and select from drop-down menu CMSIS-DAP

8. step - Utilities
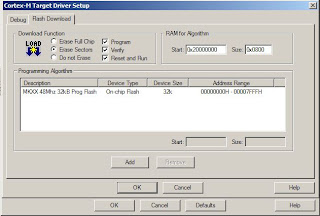
Same applies for Use Target Driver for Flash Programming - CMSIS-DAP. Click on Settings and verify everything is set according to target.


10. step - adding sources
Create new group (I name it sources) and click with your right mouse button on the group and select Add files to group .... Here's my workspace.


Now it is finally time to compile, if you followed my steps, you should get no errors ! The picture below shows window after reflashing my KL05Z, part starting with a line LOAD "C...." it's a flashing part.

We can't proceed with a bin file, due to a lack of mbed interface for our board. But CMSIS-DAP allows us to flash/debug it. Before we proceed to a debugging part, if your KL05 has not been flashed with CMSIS-DAP firmware, download it from freescale webpage - FRDM-KL05Z_QSP.zip (quick start package). There's CMSIS-DAP_OpenSDA.S19 file inside OpenSDA Applications folder. I set my board to bootloader mode and flash it with this file. Reconnect your board, and let's flash it.

Build (F7) and download your code (LOAD icon on top). This flashes KL05Z and LED should be blinking. If you want to debug it , press Ctrl+F5 (or top selection Debug -> Start/stop debuging session). Happy flashing your KL05!

If anything not clear, leave a comment.

September 11, 2013

freedom boards (K20, KL46) arrived !

I have received 2 new freedom boards (K20 and KL46, they have been on the market, but I have not had them yet).. I am fully equipped here (all hardware almost ready, only to solder sockets).

First to come it's still KL02, it has been on hold since July. Sorry guys.