I am running this tutorial on KL25Z, but as I checked, also NXP chips are supported there so this should be applied to more mbed targets than just KL25Z.
I ported CMSIS-DAP to many new freescale chips, now also bootloader is available. I was looking for open source IDE with working debugger. Finally, found something which is fast, reliable, and works with just few steps.
The very first thing is to install CoIDE. Visit link CooCox IDE [www.coocox.org] . The installation is straightforward. Once installed, open your CoIDE and select toolchain path

I added there the following path :
C:\Program Files\GNU Tools ARM Embedded\4.7 2013q3\bin
If you want to test mbed with KL25Z in CoIDE, download the project here Hello world project KL25Z CoIDE [mbed.org/media/uploads/Kojto]. I'll explain below how to create your own project, so you can change anything you like like adding your own sources, libraries.
In the same tab as Select Toolchain Path, there's New Project (the top selection). Create a new project, select a name and click next. I use KL25Z_mbed as name of the project (which will be used in some steps, so might follow the same).


This creates an empty project with one code file (main.c). Please remove that file. Export a basic hello world example from the mbed site (GCC export option), as reference this one Hello world example [mbed.org/users/simon/code]. Add it to your online compiler and export it to GCC.
Unzip the exported Hello world anywhere. The example has only main.cpp file and the mbed folder which contains mbed library with header files + some object files. We need to copy those files to our new created project's folder. There is already .coproj file which gets created later, so don't get surprised by the below picture.

After copying them, we go back to CoIDE where we need to set-up our new project. Click on the project with the right-button on your mouse, and select Configuration.

We can skip device, as we already set device (chip). Go to the Compile tab:

Add include paths (mbed folder, target_kl25z folder inside and the toolchain_gcc_arm which is inside target_kl25z folder). Add to Misc. Controls:
-fno-common; -fmessage-length=0; -Wall; -fno-exceptions; -ffunction-sections; -fdata-sections; -DTARGET_KL25Z; -DTARGET_M0P; -DTARGET_Freescale; -DTOOLCHAIN_GCC_ARM; -DTOOLCHAIN_GCC; -D__CORTEX_M0PLUS; -DARM_MATH_CM0PLUS; -std=gnu++98
We could add those defines up there to Defined Symbols, does not matter though. This should be for compile tab, move to the Link tab.
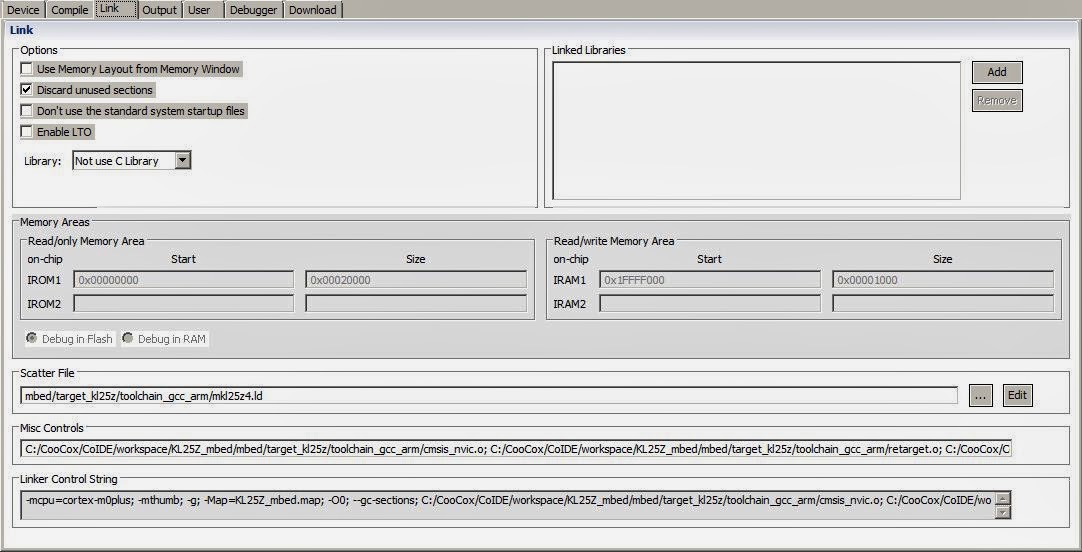
The important detail here is to uncheck Use Memory Layout from Memory Window and add linker script path (scatter file).
Add this to Misc. Controls:
--specs=nano.specs; ${project.path}/mbed/target_kl25z/toolchain_gcc_arm/cmsis_nvic.o; ${project.path}/mbed/target_kl25z/toolchain_gcc_arm/retarget.o; ${project.path}/mbed/target_kl25z/toolchain_gcc_arm/startup_MKL25Z4.o; ${project.path}/mbed/target_kl25z/toolchain_gcc_arm/system_MKL25Z4.o;
Add to Linked Libraries (just type the names there):
mbed, stdc++ , supc++ , m , gcc , c , nosys
The last thing to check is Debug tab, where select CMSIS-DAP, SWD and 1MHZ (this should be set as default for that chip).
Now press F7 (BUILD) which builds the project. It should display BUILD SUCCESSFUL if everything is correct along with size of the each areas and the command invoked.
Connect your board which mbed interface (CMSIS-DAP) and click on Debug icon (or press CTRL+F5). Debugging starts, it puts the breakpoint inside the main function, as it's shown in the picture below.

Happy debugging ! I am surprised with a speed, compared to pyOCD I tried with eclipse, this is really quick.
I will find out when other mbed chips are going to be supported.
Update1: I am currently working on an exporter to CoIDE for KL25Z, and probably later also other targets will follow.