Showing posts with label eclipse. Show all posts

September 13, 2013

mbed GCC with eclipse KL25Z (Part 2)

This is finally the debugging part which I described in one of my comments. There are at least 3 options to debug KL25Z with GCC:
CMSIS-DAP with openOCD, external Jlink or openSDA Jlink firmware.

CMSIS-DAP is still in a development, according to the site cmsis-dap: add initial cmsis-dap support [openocd.zylin.com]. Thus I went straight to Jlink's options. The last option is the most useful for many users. I will describe to process how to set it and be able to debug your KL25Z with no external parts needed.

1. step - download Jlink firmware
Visit a webpage SEGGER openSDA Jlink [http://www.segger.com], there are links on the bottom of the webpage. Be aware of some limitations which are stated there.

Download OpenSDA Jlink firmware http://www.segger.com/admin/uploads/userfiles/file/J-Link/JLink_OpenSDA.zip

2. step - get serial number of openSDA
Switch your KL25Z to the bootloader mode (unconnect usb, hold reset button, plug it back in while holding button, release button). Copy there unzipped file JLink_OpenSDA.sda
Restart the board, then plug it back to your PC.

In case you don't have installed jlink software (gdb, jlink console). Get this program from here which will display the serial number of your openSDA jlink in order to download the jlink software (you need jlink's serial number which we obviously don't know as we don't have external tool).

3. step - install JLink software
Download Jlink firmware here JLink software [http://www.segger.com]

This will install  Jlink configurator, check serial number, type it in the page pasted above and download jlink software.


After installing jlink software,  navigate to a jlink's folder in my case c:\Program Files\Segger\JLinkARM_V472a, open JLink.exe program. It will display this warning, check the below button, it won't display today, and press accept.

This should be an output if your board is connected and the jlink driver was installed properly:
 
Jlink is connected, we proceed to the eclipse project we created in part 1.

4. step - run jlink gdb server
The program is located again in the Segger Jlink software folder, named JLinkGDBServer. Execute the program, it pops the config window, set it as it is shown on the picture:

Press OK and it should display the following lines

As you see, it's connected to my freedom board. Keep it running, we will connect to it once we complete debug settings in Eclipse.

5. step - set eclipse project
Before going further, your eclipse must have installed GDB Hardware Debugging plugin. If not, please find a tutorial how to install that plugin.

Open your mbed KL25Z project, select your project, click on the green bug (the top right corner on the picture) and select Debug configuration.
Click with your right mouse button on GDB Hardware Debugging, create New one

On the bottom of the window it is "Using GDB (DSF) Hardware .... Select other . Click on select other and we need to check button Use configuration specific and select Standard GDB Hardware

Now we are back in Debug configurations, select Debugger tab and fill details according to the picture below
The tab Startup needs this details
The first input window (Initialization Commands) contain on my side the following commands
target remote localhost:2331
monitor clrbp
monitor endian little
monitor speed 1000
monitor reset
monitor sleep 100
monitor speed auto


The last input window (Run Commands) (Note: I prefer to put a breakpoint in Reset_Handler)
break main
continue


I assume your jlink gdb server is running, click on the debug icon on the bottom of Debug configurations window.

This should be your window (breakpoint is set in main, thus it stops there).


Now led should be blinking.

The debugging part over ! There are tutorials how to work with gdb. If anything not correct, please use comments below or contact me on mbed. I'll add this to my notepad there.

August 5, 2013

mbed GCC with eclipse KL25Z (Part 1)

I have published my ongoing work, adding GCC to freedom board KL25Z. I have been using eclipse (offline compiling, debugging) with JLink (could be used with Jlink firmware for openSDA, not tested yet due to my prototype board which refuses to flash Jlink firmware). I am writing this on a laptop using windows, therefore paths included here are for windows, blame on me :-) The first part is dedicated to be able to compile an application and get a binary output.

For those who hate eclipse or don't need to debug their code, just skip steps with the eclipse. This should be your step by step routine:
install gcc toolchain, download mbed sources, build mbed library, download makefile, build an application and the last step - copy bin file to mbed file disk.

There's already cookbook for eclipse debugging on mbed eclipse for building and debugging [mbed.org]. I will refer to this guide as mbed cookbook, don't need to repeat what is trivial and usually you set an enviroment only once anyway.
We will use a different approach, clone mbed git repository, set everything in eclipse, use a makefile and set a debugger. Using this approach, you use always newest version of mbed.

1. step - Install eclipse, make and GNU toolchain
Follow Install Eclipse with C/C++ and GNU Support in the mbed cookbook. It provides information how to install eclipse and make.

2. step - Download GNU toolchain
I use GCC ARM, download it from here GCC ARM embedded [launchpad.net]

3. step - Clone mbed git repo and build mbed sources for debugging
mbed git repository is here mbed git repository [github.com]. If you don't use git, neither github, download repo as zip file. This one step is crucial for offline debugging.
As soon as you have mbed source files, there's one important link to visit Mbed Tools [mbed.org/handbook]. I'll describe what you have to do in order to get mbed library. Thus you don't need to visit mbed tools link.

Create a new file named private_settings.py in mbed/workspace_tools. Here's mine set up for ARM GCC 4.7 and also KEIL which is not our concern right now. I use debug info option as default to be able to debug mbed sources.

from os.path import join

ARM_PATH = "C:/Program Files/Keil/TAD/ARM"
ARM_BIN = join(ARM_PATH,"ARMCC","bin")
ARM_INC = join(ARM_PATH,"RV31","INC")
ARM_LIB    = join(ARM_PATH,"ARMCC","lib")
ARM_CPPLIB = join(ARM_PATH, "ARMCC","lib","cpplib")

GCC_ARM_PATH = "C:/Program Files/GNU Tools ARM Embedded/4.7 2013q1/bin"

BUILD_OPTIONS = ["debug-info"]

Time to build our own mbed library, type python build.py -m KL25Z -t GCC_ARM in the command line from workspace_tool directory. This should be an output:


At the end of the output is Build successes:   * GCC_ARM::KL25Z. There was created a directory one folder up, named build. This directory should be added to your project, that's mbed library. There's library libmbed.a and many more files which I don't need to explain here.


4. step - create new project in eclipse
File -> New -> C++ Project
Select Makefile Project -> Empty Project in Project Type, Toolchains, choose Cross GCC.


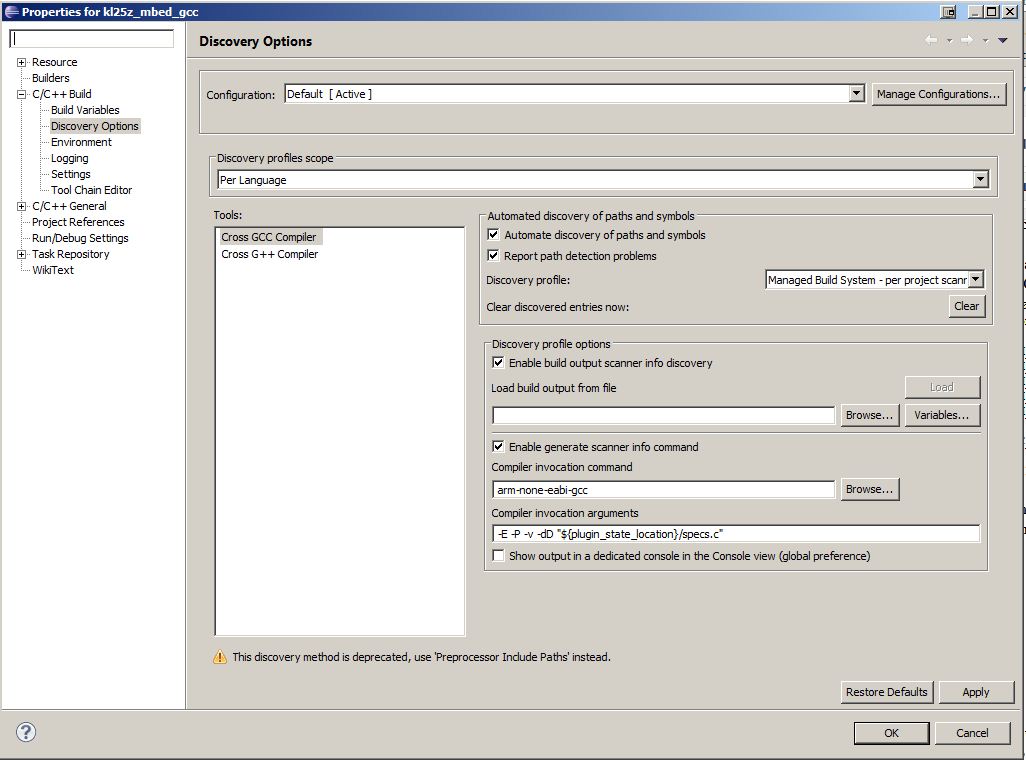
Go to the project properties as on the picture below, the compiler invocation command should be arm-none-eabi-gcc for GCC and arm-none-eabi-g++ for G++ compiler.


Click on C++ Build and uncheck Use default build command,  type there
C:\PROGRA~1\GnuWin32\bin\make.exe . Note here, that I had a problem with spaces in paths, therefore I changed PATH variable in Environment which is under C/C++ Build options. Please verify there's also folder where you installed GCC ARM (an example C:\PROGRA~1\GNU Tools ARM Embedded\4.7 2013q1\bin).


5. step - get a makefile or create a new one
This step is optional. I wrote the makefile to build an application with mbed. Download it from mbed_gcc_kl25z [https://github.com/0xc0170].

The file structure in mbed changes seldomly, therefore I include here what to check in my makefile and probably there will dwell a problem.
A variable MBED_OBJ contains object files from the mbed source. The dirs variables (INC_DIRS and SRC_DIRS) define directory structure as it is at the moment.


6. step - copy the mbed library and an application
Copy the mbed folder which is inside build directory. It's output from the step 3. I have selected to start with Hello World (KL25z examples [mbed.org/handbook]).

Here is the project tree structure.

mbed folder is folder which is copied from sources build which we did in the 3d step. main.cpp contains hello world application, makefile is my own. Files starting with . (project and cproject) are eclipse project files.


7. step - build an application
If you set everything according to this tutorial, you should be able to build an application.
Here's the output from the console:

Finished building target: out/mbed.elf

Printing size
arm-none-eabi-size --totals out/mbed.elf
   text       data        bss        dec        hex    filename
  26932        216        316      27464       6b48    out/mbed.elf
  26932        216        316      27464       6b48    (TOTALS)
arm-none-eabi-objcopy -O srec out/mbed.elf out/mbed.s19
arm-none-eabi-objcopy -O binary -v out/mbed.elf out/mbed.bin
copy from `out/mbed.elf' [elf32-littlearm] to `out/mbed.bin' [binary]
arm-none-eabi-objdump -D out/mbed.elf > out/mbed.lst
arm-none-eabi-nm out/mbed.elf > out/mbed-symbol-table.txt


The output size is huge (text section), thus we will need to tune our makefile in order to squeeze it.


One last note, I use KL25Z, to set it to any other platform should be trivial. The binary file was generated in the output folder. That one is ready to be copied to mbed.

That's compiling part. I'll continue in the next post with debugging part.


July 10, 2013

Makefile for mbed with GCC on KL25

I pushed a Makefile for KL25Z mbed with ARM GCC to my github Makefile [https://github.com/0xc0170].

I intended to use only eclipse with all those available options. It turned out it was time-consuming to set everything correctly, therefore I wrote this makefile which made everything easier. Small modification should allow you to use it on different targets. I have seen gcc4mbed but that was too much files for my taste. The makefile follows the directory structure which is at the moment. It has changed recently and will be different I believe soon again.

Files which are used are not yet a part of mbed, I am still facing a problem with binary created. It just locks KL25Z and does not run. I'll prepare an article how to debug KL25Z in eclipse with mbed.

June 2, 2013

GCC ARM Embedded + Eclipse on Kinetis with JLink

I have been writing my own start-up and a linker command file for K60 Tower board. Unfortunately, I am still having an unidentified problem with OSJTAG, I  had decided to use jlink with eclipse. I don't use yagarto tool chain, decided to go with GCC ARM embedded.
 There's been many resources on the internet, I'll post which helped me to set it correctly.

Getting Started with the ARM GCC Compiler on Windows PART 1 [thehackerworkshop.com]
Guide how to set eclipse development (GCC ARM, make, eclipse). This guide (Part 1 plus part 2) is more detailed than the original one published on emb4fun.

You can skip few steps in PART 2, right to the Step 5 if you are not using the ST discovery board. This is the most important one, once you set everything, add files, you should be able to compile and link your project files.

This is a highlight what you should look for:
  • C/C++ Build - External builder , build command - make (or set PATH correctly)
  • C/C++ Build - Discovery options - set arm-none-eabi-
  • In linker options inside Tool Settings - there's a flag where you type a path to a linker command file (an example : -T ./../Sources/PK60N512_flash.ld)
  • In compiler options inside Tool Settings - there's other flags option where you type at least these two flags -mcpu=cortex-m4 -mthumb (same should apply for assembler flags)

The last step before debugging, is to set gdb commands inside a created debug configuration (click 2x on the GDB hardware debugging to create a new one). This are taken from the example shared on yagarto webpage, targeted for K40. They are valid for jlink.

These are initialization commands:
target remote localhost:2331
monitor flash device = MK60DN512xxx10
monitor flash download = 1
monitor flash breakpoints = 1
monitor clrbp
monitor endian little
monitor speed 1000
monitor reset
monitor sleep 100
monitor speed auto
monitor writeu32 0xE000ED08 = 0x00000000

These are run commands:
monitor reg r13 = (0x00000000)
monitor reg pc = (0x00000004)
break main
continue

I did not want to repeat what you can find online, but if there's anything unclear, not able to debug your application using jlink on any Tower from Kinetis line, let me know and I can expand this into a small tutorial ;)

I am planning to publish a small gcc application for some tower boards, or perhaps all, depends on how much time I'll have these days ;) Because when you look into code what CodeWarrior generates with gcc, you marvel how much lines that code contains, most of it are unnecessary.

Update June 9th: a demo app for TWRK60N512 is published.