February 22, 2014

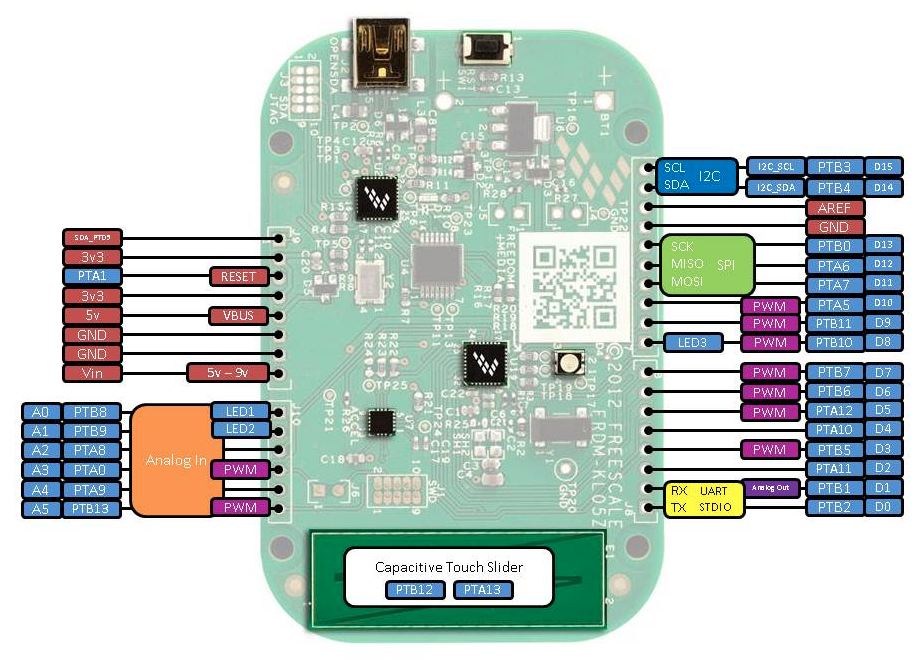
FRDM KL05Z is mbed enabled (news)

The FRDM-KL05Z board was my first target added to mbed. I would even say that was my initial experience with mbed sources. That was back in June 2013. It was added to mbed.org yesterday. This became 3rd Freescale board available on mbed.


FRDM-KL05Z [mbed.org/platforms]

It supports export to ARM GCC, uVision and CoIDE.

Paul Staron shared an info about low power modes and his power measurements. Not possible to carry out on FRDM board though. Here's a link for more information FRDM-KL05Z sleep modes and RTC [mbed.org/forum]

February 17, 2014

CoIDE export is available for KL25Z on mbed (news)

My latest article was how to use CoIDE with C++. I added exporters for CoIDE to mbed. I was able to make it work for KL25Z, KL05Z (not yet online on mbed.org site, will be soon). LCP1768 is functional but not through CMSIS-DAP, due to a problem which was reported to CoIDE team a while ago.

The exporter is online in the mbed compiler, see picture below.


Enjoy using CooCox CoIDE with KL25Z and mbed! If there are any problems, please report them on the mbed site, or just here in comments.

January 27, 2014

CoIDE fix for using C++

Frank V. reported an issue with linking C++ libraries which I confirmed. I just issued a new pull request for mbed exporters with the fix. In case you followed my last tutorial for CoIDE & mbed, this might be helpful.

The problem was that CoIDE completely ignored c++ libraries in the Misc controls for LINK. To surpass this issue, you have to add libraries to the Linked Libraries. Add there the libraries (type there names):
mbed
stdc++
supc++
m
gcc
c
nosys

If you prefer to change it directly in the xml (coproj file), add this to already created project:
        <LinkedLibraries>
          <Libset dir="" libs="mbed"/>
          <Libset dir="" libs="stdc++"/>
          <Libset dir="" libs="supc++"/>
          <Libset dir="" libs="m"/>
          <Libset dir="" libs="gcc"/>
          <Libset dir="" libs="c"/>
          <Libset dir="" libs="nosys"/>
        </LinkedLibraries>


And of course, remove 
-lmbed; -lstdc++; -lsupc++; -lm; -lc; -lgcc; -lnosys; -lmbed; -lstdc++; -lsupc++; -lm; -lc; -lgcc; -lnosys;

from UserEditLinker in the xml file or just from Misc control in the IDE. The path to look for mbed library is already there thanks to using ld file which adds it to the linker searching path.

I tested this setup with cc3000 udp server demo. 

I added KL05Z exporter for CoIDE, can test it using project.py. There is also LPC1768 present, but currently has problems in CoIDE with CMSIS-DAP (due to the bootloader), so it's not enabled yet. 

January 11, 2014

CoIDE with KL25Z and mbed (C++) (tutorial)

I decided to start contributed to open source one year ago, as my start project I selected CoX library. I was pleased with CooCox CoIDE back in those days, it's light, easy to set-up, fast and was reliable. However, I abandoned CoX library since than as well as their IDE named CoIDE. This tutorial brings back CoIDE to my life as GCC is supported to all available Freescale targets.

I am running this tutorial on KL25Z, but as I checked, also NXP chips are supported there so this should be applied to more mbed targets than just KL25Z.

I ported CMSIS-DAP to many new freescale chips, now also bootloader is available. I was looking for open source IDE with working debugger. Finally, found something which is fast, reliable, and works with just few steps.

The very first thing is to install CoIDE.  Visit link CooCox IDE [www.coocox.org] . The installation is straightforward. Once installed, open your CoIDE and select toolchain path


I added there the following path :
C:\Program Files\GNU Tools ARM Embedded\4.7 2013q3\bin

If you want to test mbed with KL25Z in CoIDE, download the project here Hello world project KL25Z CoIDE [mbed.org/media/uploads/Kojto]. I'll explain below how to create your own project, so you can change anything you like like adding your own sources, libraries.

In the same tab as Select Toolchain Path, there's New Project (the top selection). Create a new project, select a name and click next. I use KL25Z_mbed as name of the project (which will be used in some steps, so might follow the same).
The next step is to select a chip or a board, just use Chip
The chip which is assembled on the freedom KL25Z board, is MKL25Z128VLK4. Then click Finish. The project is created and should be visible in the right bottom corner.

This creates an empty project with one code file (main.c). Please remove that file. Export a basic hello world example from the mbed site (GCC export option), as reference this one Hello world example [mbed.org/users/simon/code]. Add it to your online compiler and export it to GCC.

Unzip the exported Hello world anywhere. The example has only main.cpp file and the mbed folder which contains mbed library with header files + some object files. We need to copy those files to our new created project's folder. There is already .coproj file which gets created later, so don't get surprised by the below picture.

 After copying them, we go back to CoIDE where we need to set-up our new project. Click on the project with the right-button on your mouse, and select Configuration.
This is the crucial step, to set up correctly gcc project. There are few tabs : Device, Compile, Link and more.

We can skip device, as we already set device (chip). Go to the Compile tab:

Add include paths (mbed folder, target_kl25z folder inside and the toolchain_gcc_arm which is inside target_kl25z folder). Add to Misc. Controls:

-fno-common; -fmessage-length=0; -Wall; -fno-exceptions; -ffunction-sections; -fdata-sections; -DTARGET_KL25Z; -DTARGET_M0P; -DTARGET_Freescale; -DTOOLCHAIN_GCC_ARM; -DTOOLCHAIN_GCC; -D__CORTEX_M0PLUS; -DARM_MATH_CM0PLUS;  -std=gnu++98

We could add those defines up there to Defined Symbols, does not matter though. This should be for compile tab, move to the Link tab.


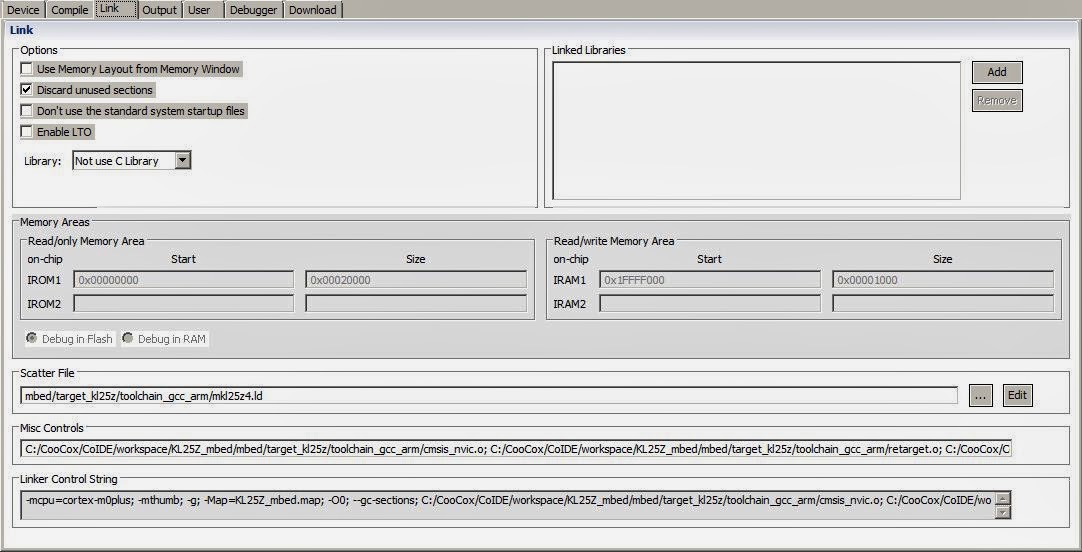
The important detail here is to uncheck Use Memory Layout from Memory Window and add linker script path (scatter file).

Add this to Misc. Controls:
--specs=nano.specs; ${project.path}/mbed/target_kl25z/toolchain_gcc_arm/cmsis_nvic.o; ${project.path}/mbed/target_kl25z/toolchain_gcc_arm/retarget.o; ${project.path}/mbed/target_kl25z/toolchain_gcc_arm/startup_MKL25Z4.o; ${project.path}/mbed/target_kl25z/toolchain_gcc_arm/system_MKL25Z4.o;

Add to Linked Libraries (just type the names there):
mbed, stdc++ , supc++ , m , gcc , c , nosys

The last thing to check is Debug tab, where select CMSIS-DAP, SWD and 1MHZ (this should be set as default for that chip).

Now press F7 (BUILD) which builds the project. It should display BUILD SUCCESSFUL if everything is correct along with size of the each areas and the command invoked.

Connect your board which mbed interface (CMSIS-DAP) and click on Debug icon (or press CTRL+F5). Debugging starts, it puts the breakpoint inside the main function, as it's shown in the picture below.


Happy debugging ! I am surprised with a speed, compared to pyOCD I tried with eclipse, this is really quick.

I will find out when other mbed chips are going to be supported.

Update1: I am currently working on an exporter to CoIDE for KL25Z, and probably later also other targets will follow.

January 6, 2014

CMSIS-DAP bootloader for K20 interface (news)

The freedom platform and some tower boards contain openSDA circuit. OpenSDA is managed by Freescale Kinetis K20 MCU (Cortex -M4).

It is claimed to be open-standard serial and debug adapter. It's not by "all" means, because the P&E bootloader can't be reprogrammed, as the chip is locked. Thus CMSIS-DAP interface was used on top of P&E bootloader.

CMSIS-DAP is the interface firmware which connects the Debug Port to USB. It consists of a debug unit and a device, both are usually assembled on a single board.


I was porting bootloader for K20 the last 3 days. As result, I sent yesterday a pull request to CMSIS-DAP repository (consider it's the first initial version as it's not yet on master branch), which means that the circuit openSDA (K20) will have full CMSIS-DAP support.
The link to my pull request Pull request #14 for CMSIS-DAP [github.com/mbedmicro/CMSIS-DAP]

You can freely design your boards which could use CMSIS-DAP (bootloader + interface). I will describe CMSIS-DAP more in the following days.

December 29, 2013

How to build mbed src and Hello world (AMRCC, ARM GCC) (tutorial)

This tutorial is dedicated to building mbed sources and exporting hello world. K20D5M is going to be used as an example, because it is still not available in the mbed online compiler. Thus this give us to compile any application based on mbed libraries. My machine is running Windows so paths presented in the 2nd step are for windows.

1. Download the mbed github repository

If you are familiar with git, just clone repository using git clone command. For those who don't use git, download the repository as archive (zip).
Link mbed src ZIP archive (~5MB) [github.com/mbedmicro/mbed]

After downloading is completed, unzip the archive.

2. Set your toolchain paths

There few toolchains which can be used, I'll present ARM GCC and ARMCC (uVision). Create a new file named private_settings.py in the workspace_tools directory. This private settings file defines settings which overrides default settings.

from os.path import join
#KEIL
ARM_PATH = "C:/Keil/ARM"
ARM_BIN = join(ARM_PATH,"ARMCC","bin")
ARM_INC = join(ARM_PATH,"RV31","INC")
ARM_LIB    = join(ARM_PATH,"ARMCC","lib")
ARM_CPPLIB = join(ARM_PATH, "ARMCC","lib","cpplib")

#GCC ARM
GCC_ARM_PATH = "C:/Program Files/GNU Tools ARM Embedded/4.7 2013q3/bin"

BUILD_OPTIONS = ["debug-info"]

ARM_ paths are used for ARMCC (uVision IDE, paths for each folders might vary, as I had problems with previous versions, because they changed the folder structure), GCC_ARM_ path for ARM GCC toolchain path. Set those according your installation folder.
I use debug-info build-option, to include debug symbols.

3. Build sources for your target

To build mbed sources for TARGET and TOOLCHAIN, use command:
python build.py -m TARGET -t TOOLCHAIN

The list of supported targets is quite long, to check if your TARGET is supported TARGETS array [github.com/mbedmicro/mbed].
Each TARGET defines supported TOOLCHAIN. For example, K20D5M has ARM and GCC_ARM.

To build for ARM (that's ARMCC used in uVision for example)
python build.py -m K20D5M -t ARM

To build for GCC ARM
python build.py -m K20D5M -t GCC_ARM

If you just invoke command without -t, the target will be built for all supported toolchains.

4. Using exporters

As soon as you have built mbed sources for your target, go to my previous tutorial about using exporters. There is just shown to export Hello world example.

How to use mbed exporters

5. Build an application

Using ARM GCC, use makefile to build an application. If uVision is used, build the application in the uVision IDE. No matter what toolchain you use, they should generate a binary file, which can be copied to mbed msd drive. Same procedure as it's used by the mbed online compiler.

December 28, 2013

FRDM KL05, FRDM K20D50M testing for mbed enablement

Is anybody out there who wants to participate in enabling those 2 platforms? I posted instructions how to debug KL05Z target offline with mbed sources few weeks ago. However, I did not receive any feedback if that is working for you or any problems with its implementation.

The fresh new target K20D50M is still not complete, thus needed some more tweaks to complete its implementation.

Here's a post from mbed, good place to start:  Let's enable KL05Z and K20D5M targets online on mbed [mbed.org/forum/mbed]
Leave a comment, preferably there on mbed community.

December 26, 2013

How to use mbed exporters (tutorial)

I always created my own projects while I was developing offline with mbed. Fortunately, there are exporters which I assume are used in the online compiler. They are available in the mbed sources, in the folder /workspace_tools/export, Github mbed - export folder [github.com/mbedmicro/mbed]

These exporters support more platforms than online compiler, thus if you see a platform in the mbed sources but is not yet available online, this is your chance to start using your target. It requires IDE or at least a toolchain to compile it.

What targets are currently supported by exporters?
  • NUCLEO_F103RB
  • KL25Z,
  • LPC1347
  • LPC11U24_301
  • LPC4330_M4
  • nRF51822,
  • LPC11U35_401
  • LPC810
  • KL46Z
  • LPC812
  • KL05Z
  • LPC1768
  • K20D5M
  • LPC4088
  • LPC11C24
  • MBED_MCU
  • LPC1114
  • LPC11U24,
  • STM32F407
  • LPC2368

To see what options are available, invoke project.py, an output:

d:\Code\git_repo\github\mbed\workspace_tools>python project.py


[ERROR] You have to specify one of the following tests:
[ 0] MBED_A1: Basic
[ 1] MBED_A2: semihost file system
[ 2] MBED_A3: C++ STL
[ 3] MBED_A4: I2C TMP102
[ 4] MBED_A5: DigitalIn DigitalOut
[ 5] MBED_A6: DigitalInOut
[ 6] MBED_A7: InterruptIn
[ 7] MBED_A8: Analog
[ 8] MBED_A9: Serial Echo at 115200
[ 9] MBED_A10: PortOut PortIn
[ 10] MBED_A11: PortInOut
[ 11] MBED_A12: SD File System
[ 12] MBED_A13: I2C MMA7660
[ 13] MBED_A14: I2C Master
[ 14] MBED_A15: I2C Slave
[ 15] MBED_A16: SPI Master
[ 16] MBED_A17: SPI Slave
[ 17] MBED_A18: Interrupt vector relocation
[ 18] MBED_A19: I2C EEPROM read/write test
[ 19] MBED_A20: I2C master/slave test
[ 20] MBED_A21: Call function before main (mbed_main)
[ 21] MBED_A22: SPIFI for LPC4088 (test 1)
[ 22] MBED_A23: SPIFI for LPC4088 (test 2)
[ 23] MBED_A24: Serial echo with RTS/CTS flow control
[ 24] BENCHMARK_1: Size (c environment)
[ 25] BENCHMARK_2: Size (float math)
[ 26] BENCHMARK_3: Size (printf)
[ 27] BENCHMARK_4: Size (mbed libs)
[ 28] BENCHMARK_5: Size (all)
[ 29] MBED_1: I2C SRF08
[ 30] MBED_2: stdio
[ 31] MBED_3: PortOut
[ 32] MBED_4: Sleep
[ 33] MBED_5: PWM
[ 34] MBED_6: SW Reset
[ 35] MBED_7: stdio benchmark
[ 36] MBED_8: SPI
[ 37] MBED_9: Sleep Timeout
[ 38] MBED_10: Hello World
[ 39] MBED_11: Ticker
[ 40] MBED_12: C++
[ 41] MBED_13: Heap & Stack
[ 42] MBED_14: Serial Interrupt
[ 43] MBED_15: RPC
[ 44] MBED_16: RTC
[ 45] MBED_17: Serial Interrupt 2
[ 46] MBED_18: Local FS Directory
[ 47] MBED_19: SD FS Directory
[ 48] MBED_20: InterruptIn 2
[ 49] MBED_21: freopen Stream
[ 50] MBED_22: Semihost
[ 51] MBED_23: Ticker 2
[ 52] MBED_24: Timeout
[ 53] MBED_25: Time us
[ 54] MBED_26: Integer constant division
[ 55] MBED_27: SPI ADXL345
[ 56] MBED_28: Interrupt chaining (InterruptManager)
[ 57] MBED_29: CAN network test
[ 58] MBED_30: CAN network test using interrupts
[ 59] MBED_31: PWM LED test
[ 60] CMSIS_RTOS_1: Basic
[ 61] CMSIS_RTOS_2: Mutex
[ 62] CMSIS_RTOS_3: Semaphore
[ 63] CMSIS_RTOS_4: Signals
[ 64] CMSIS_RTOS_5: Queue
[ 65] CMSIS_RTOS_6: Mail
[ 66] CMSIS_RTOS_7: Timer
[ 67] CMSIS_RTOS_8: ISR
[ 68] RTOS_1: Basic
[ 69] RTOS_2: Mutex
[ 70] RTOS_3: Semaphore
[ 71] RTOS_4: Signals
[ 72] RTOS_5: Queue
[ 73] RTOS_6: Mail
[ 74] RTOS_7: Timer
[ 75] RTOS_8: ISR
[ 76] RTOS_9: File
[ 77] NET_1: TCP client hello world
[ 78] NET_2: UDP client hello world
[ 79] NET_3: TCP echo server
[ 80] NET_4: TCP echo client
[ 81] NET_5: UDP echo server
[ 82] NET_6: UDP echo client
[ 83] NET_7: HTTP client
[ 84] NET_8: NTP client
[ 85] NET_9: Multicast Send
[ 86] NET_10: Multicast Receive
[ 87] NET_11: Broadcast Send
[ 88] NET_12: Broadcast Receive
[ 89] NET_13: TCP client echo loop
[ 90] UB_1: u-blox USB modem: HTTP client
[ 91] UB_2: u-blox USB modem: SMS test
[ 92] USB_1: Mouse
[ 93] USB_2: Keyboard
[ 94] USB_3: Mouse_Keyboard
[ 95] USB_4: Serial Port
[ 96] USB_5: Generic HID
[ 97] USB_6: MIDI
[ 98] USB_7: AUDIO
[ 99] CMSIS_DSP_1: FIR
[100] DSP_1: FIR
[101] KL25Z_1: LPTMR
[102] KL25Z_2: PIT
[103] KL25Z_3: TSI Touch Sensor
[104] KL25Z_4: RTC
[105] KL25Z_5: MMA8451Q accelerometer
[106] EXAMPLE_1: /dev/null
[107] EXAMPLE_2: FS + RTOS


Usage: project.py [options]

Options:
-h, --help show this help message and exit
-m MCU, --mcu=MCU generate project for the given MCU (NUCLEO_F103RB, KL25Z,
LPC1347, LPC11U24_301, LPC4330_M4, nRF51822,
LPC11U35_401, LPC810, KL46Z, LPC812, KL05Z, LPC1768,
K20D5M, LPC4088, LPC11C24, MBED_MCU, LPC1114, LPC11U24,
STM32F407, LPC2368)
-p PROGRAM The index of the desired test program: [0-107]
-i IDE The target IDE: ['ds5_5', 'gcc_arm', 'codered',
'codesourcery', 'uvision', 'iar']
-b Use the mbed library build, instead of the sources

The output provides all information which we need to build a project. As I pushed today K20D5M target to mbed repository, I'll take that as an example how to start with mbed target which is not yet supported in the mbed compiler.
If you don't have prebuilt mbed sources for your target, don't use -b option (you can use it if you have built your target previously, then it creates the mbed library, same output as from the online compiler exporter). If you have not built target sources, use -b option, error is shown.

The very first application we can build is Hello world ([ 38] MBED_10: Hello World) To build it for GCC ARM, invoke:

python project.py -m K20D5M -p 38 -i gcc_arm

If you receive an error which contains jinja2, that means the projects generators require jinja2 package, please add it to your python installation. Easy install can help you, for more help, a procedure Jinja2 windows - how to install [forums.udacity.com/questions]

The output should be many compiled files, at the end [OK]. In the mbed root directory, there's should be a new folder build. Inside in the path build/export/workspace are sources which were copied there by an exporter. In the build/export folder, should be located an archive MBED_10_GCC_ARM_K20D5M.zip
This archive contains the exported application, unzip it , invoke make command to build Hello world application.