I created a branch from mbed master, which contains KL46Z GCC ARM support.
KL46Z is similar to KL25Z. Be aware of their differences. KL46Z is bigger brother of KL25Z, it has on top of KL25Z features - I2S and LCD module. The memory footprint is also bigger (256mb flash, 32kb ram).
I officially started testing today, I made GCC running with my makefile few days ago. This time I took a look at MUX options in HAL layer and interrupts. Of course, there were problems I had to face.
I added KEIL (in mbed is named ARM). I met again with BKTP instruction in KEIL (heap was set to 0, as the
last time), clock configuration was set to a wrong value. Consequently, timer's clock were not activated - no Ticker interrupt.
All this updates are currently on my branch, will be available soon.
Showing posts with label KEIL. Show all posts
Showing posts with label KEIL. Show all posts
September 29, 2013
September 12, 2013
How to flash/debug KL05 with mbed library offline in KEIL (tutorial)
Hello,
I finally allocated one evening to finish what I should have done earlier. I did not anticipate that at this time KL05 wouldn't be online on mbed (no mbed interface for this board yet). This is step guide how to debug it with free version of KEIL (I'll add ARM GCC later).
1. step - clone mbed git repository from github
mbed git repository is here mbed git repository [github.com]
If you don't use git, or github, download repository as zip file. This is crucial for offline debugging.
Create a new file named private_settings.py in mbed/workspace_tools. Put the following source code there (I am using KEIL 4.6 at the moment, KEIL seldomly changes their folder structure).
Time to build our own mbed library, type on your command line python build.py -m KL05Z -t ARM from workspace_tool directory.
If everything went ok, the output should state Build successes: * ARM::KL05Z. Built library is now inside build folder (same level than workspace_tools and libraries folders).
2. step - create KEIL project
Create new folder (I name mine KL05_demo) and copy there entire folder mbed which is inside build directory. Open KEIL, select Project on the top toolbar and create a new project inside our new created directory. It asks you to choose a processor, MKL05Z32xxx4 is assembled on the freedom KL05Z.
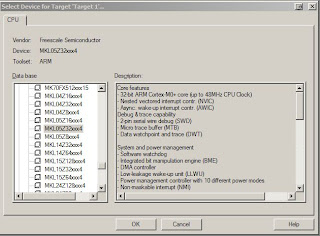
Click OK, it ask if you want to copy startup file, click No. We don't need it. This should be an output inside the Project window

Remove that Source Group 1.
3. step - main code file
Create new main.cpp inside the project directory and paste there the simple demo. Here's my code:
4. step - Set our new created project for KL05Z
The tab which we start with, it's User. Add there fromelf --bin -o test05_KL05Z.bin test05.axf
This step can be skipped because KL05Z does not have the mbed interface yet. Once it does, this command creates a .bin file which you can copy to a mbed drive.

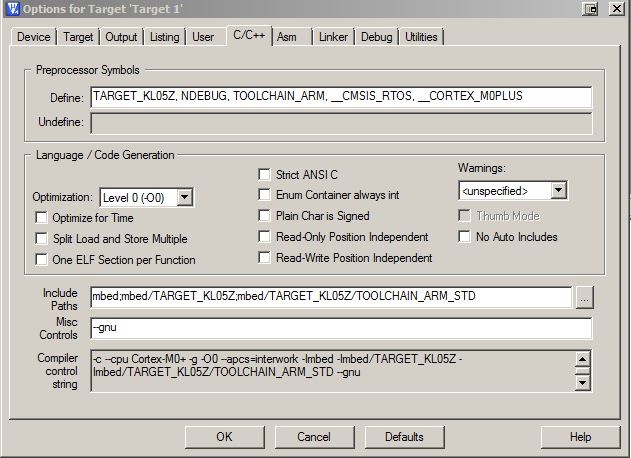
5.step - C/C++ tab
Fill Define with
TARGET_KL05Z, NDEBUG, TOOLCHAIN_ARM, __CMSIS_RTOS, __CORTEX_M0PLUS
The include paths should contain folders (add folder with the first icon, a small rectangle):
mbed
mbed/TARGET_KL05Z
mbed/TARGET_KL05Z/TOOLCHAIN_ARM_STD

The misc Controls should contain --gnu command.

The asm tab should also have filled same Include Paths as C/C++. Copy them there.
6. step - Linker tab
Uncheck Memory Layout from Target Dialog. We need to add scatter file which is located inside mbed/TARGET_KL05/TOOLCHAIN_ARM_STD, named MKL05Z4.sct. Add it there.
This is what it should display : .\mbed\TARGET_KL05Z\TOOLCHAIN_ARM_STD\MKL05Z4.sct
Add precompiled mbed files to Misc controls which is right below Scatter file:
mbed/TARGET_KL05Z/TOOLCHAIN_ARM_STD/sys.o
mbed/TARGET_KL05Z/TOOLCHAIN_ARM_STD/retarget.o
mbed/TARGET_KL05Z/TOOLCHAIN_ARM_STD/cmsis_nvic.o
mbed/TARGET_KL05Z/TOOLCHAIN_ARM_STD/system_MKL05Z4.o
mbed/TARGET_KL05Z/TOOLCHAIN_ARM_STD/startup_MKL05Z4.o
mbed/TARGET_KL05Z/TOOLCHAIN_ARM_STD/mbed.ar
7. step - Debug tab
Now select the right radio button Use and select from drop-down menu CMSIS-DAP
8. step - Utilities
Same applies for Use Target Driver for Flash Programming - CMSIS-DAP. Click on Settings and verify everything is set according to target.
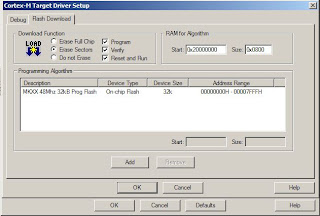
10. step - adding sources
Create new group (I name it sources) and click with your right mouse button on the group and select Add files to group .... Here's my workspace.

Now it is finally time to compile, if you followed my steps, you should get no errors ! The picture below shows window after reflashing my KL05Z, part starting with a line LOAD "C...." it's a flashing part.

We can't proceed with a bin file, due to a lack of mbed interface for our board. But CMSIS-DAP allows us to flash/debug it. Before we proceed to a debugging part, if your KL05 has not been flashed with CMSIS-DAP firmware, download it from freescale webpage - FRDM-KL05Z_QSP.zip (quick start package). There's CMSIS-DAP_OpenSDA.S19 file inside OpenSDA Applications folder. I set my board to bootloader mode and flash it with this file. Reconnect your board, and let's flash it.
Build (F7) and download your code (LOAD icon on top). This flashes KL05Z and LED should be blinking. If you want to debug it , press Ctrl+F5 (or top selection Debug -> Start/stop debuging session). Happy flashing your KL05!
If anything not clear, leave a comment.
I finally allocated one evening to finish what I should have done earlier. I did not anticipate that at this time KL05 wouldn't be online on mbed (no mbed interface for this board yet). This is step guide how to debug it with free version of KEIL (I'll add ARM GCC later).
1. step - clone mbed git repository from github
mbed git repository is here mbed git repository [github.com]
If you don't use git, or github, download repository as zip file. This is crucial for offline debugging.
Create a new file named private_settings.py in mbed/workspace_tools. Put the following source code there (I am using KEIL 4.6 at the moment, KEIL seldomly changes their folder structure).
from os.path import join

ARM_PATH = "C:/Program Files/Keil/TAD/ARM"
ARM_BIN = join(ARM_PATH,"ARMCC","bin")
ARM_INC = join(ARM_PATH,"RV31","INC")
ARM_LIB    = join(ARM_PATH,"ARMCC","lib")
ARM_CPPLIB = join(ARM_PATH, "ARMCC","lib","cpplib")

BUILD_OPTIONS = ["debug-info"]
Time to build our own mbed library, type on your command line python build.py -m KL05Z -t ARM from workspace_tool directory.
If everything went ok, the output should state Build successes: * ARM::KL05Z. Built library is now inside build folder (same level than workspace_tools and libraries folders).
2. step - create KEIL project
Create new folder (I name mine KL05_demo) and copy there entire folder mbed which is inside build directory. Open KEIL, select Project on the top toolbar and create a new project inside our new created directory. It asks you to choose a processor, MKL05Z32xxx4 is assembled on the freedom KL05Z.

Click OK, it ask if you want to copy startup file, click No. We don't need it. This should be an output inside the Project window
Remove that Source Group 1.
3. step - main code file
Create new main.cpp inside the project directory and paste there the simple demo. Here's my code:
#include "mbed.h"

DigitalOut myled(LED1);

int main() {
    while(1) {
        myled = 1;
        wait(0.2);
        myled = 0;
        wait(0.2);
    }
}
4. step - Set our new created project for KL05Z
The tab which we start with, it's User. Add there fromelf --bin -o test05_KL05Z.bin test05.axf
This step can be skipped because KL05Z does not have the mbed interface yet. Once it does, this command creates a .bin file which you can copy to a mbed drive.

5.step - C/C++ tab
Fill Define with
TARGET_KL05Z, NDEBUG, TOOLCHAIN_ARM, __CMSIS_RTOS, __CORTEX_M0PLUS
The include paths should contain folders (add folder with the first icon, a small rectangle):
mbed
mbed/TARGET_KL05Z
mbed/TARGET_KL05Z/TOOLCHAIN_ARM_STD

The misc Controls should contain --gnu command.
The asm tab should also have filled same Include Paths as C/C++. Copy them there.
6. step - Linker tab
Uncheck Memory Layout from Target Dialog. We need to add scatter file which is located inside mbed/TARGET_KL05/TOOLCHAIN_ARM_STD, named MKL05Z4.sct. Add it there.
This is what it should display : .\mbed\TARGET_KL05Z\TOOLCHAIN_ARM_STD\MKL05Z4.sct
Add precompiled mbed files to Misc controls which is right below Scatter file:
mbed/TARGET_KL05Z/TOOLCHAIN_ARM_STD/sys.o
mbed/TARGET_KL05Z/TOOLCHAIN_ARM_STD/retarget.o
mbed/TARGET_KL05Z/TOOLCHAIN_ARM_STD/cmsis_nvic.o
mbed/TARGET_KL05Z/TOOLCHAIN_ARM_STD/system_MKL05Z4.o
mbed/TARGET_KL05Z/TOOLCHAIN_ARM_STD/startup_MKL05Z4.o
mbed/TARGET_KL05Z/TOOLCHAIN_ARM_STD/mbed.ar
7. step - Debug tab
Now select the right radio button Use and select from drop-down menu CMSIS-DAP
8. step - Utilities
Same applies for Use Target Driver for Flash Programming - CMSIS-DAP. Click on Settings and verify everything is set according to target.
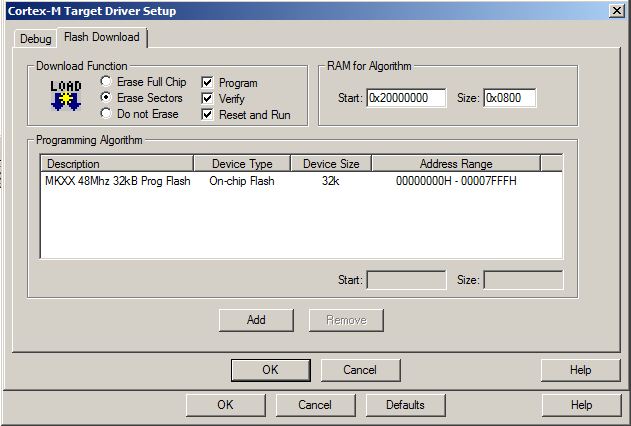
10. step - adding sources
Create new group (I name it sources) and click with your right mouse button on the group and select Add files to group .... Here's my workspace.

Now it is finally time to compile, if you followed my steps, you should get no errors ! The picture below shows window after reflashing my KL05Z, part starting with a line LOAD "C...." it's a flashing part.

We can't proceed with a bin file, due to a lack of mbed interface for our board. But CMSIS-DAP allows us to flash/debug it. Before we proceed to a debugging part, if your KL05 has not been flashed with CMSIS-DAP firmware, download it from freescale webpage - FRDM-KL05Z_QSP.zip (quick start package). There's CMSIS-DAP_OpenSDA.S19 file inside OpenSDA Applications folder. I set my board to bootloader mode and flash it with this file. Reconnect your board, and let's flash it.
Build (F7) and download your code (LOAD icon on top). This flashes KL05Z and LED should be blinking. If you want to debug it , press Ctrl+F5 (or top selection Debug -> Start/stop debuging session). Happy flashing your KL05!
If anything not clear, leave a comment.
March 24, 2013
Stack usage for ARM Cortex-M
I'll present how I used one of the methods to measure stack usage, not using any plugin, just debugger and memory window.
Methods to use:
1. IDE plugins (usually compiler and linker do the job)
2. Fill pattern (add small assembly routine in startup)
3. Take an address of the stack pointer in the main function, and in the most nested function (for a simple application usable)
IAR stack plugin [www.iar.com]
This document is targeted to IAR stack plugin. Although this did not work for the MCU I debugged.
Stack and Heap [www.iar.com]
What's stack, heap, methods explained briefly how to calculate stack usage in IAR. Methods applicable for other IDE's as well, not limited to IAR only.
Stack use in C and C++ [www.keil.com]
How to obtain stack usage in KEIL using callgraph (option --callgraph).
Here's callgraph output which I found on the internet, not needed to share mine:
Keil callgraph - an example [ftp.analog.com/pub/MicroConverter]
Using indirect calls (function pointers) make this method unreliable, same for IAR stack plugin, where it can be added #pragma calls, but what if an application using another library, that's too much changes to do, more simple approach is in a following paragraph presented, a filling memory for a stack with a pattern and show how low it gets.
KEIL stack initialize routine [www.keil.com/forum]
Stack initialization routine, which I only accustomed to Thumb-2. Here's the code used on Cortex-M0. Label __user_initial_stackheap is located in assembly file for your board. Just run your application for a while and check the memory window to obtain the lowest address of the last character of your pattern (in our case it's AA (char values)). Calculate the subtraction which gives your application stack usage.
This also can be added in assembly file which is used in IAR or any other IDE, just replace Stack_Mem symbol (beginning of the stack) and Stack_Size (size of the stack).
Methods to use:
1. IDE plugins (usually compiler and linker do the job)
2. Fill pattern (add small assembly routine in startup)
3. Take an address of the stack pointer in the main function, and in the most nested function (for a simple application usable)
IAR stack plugin [www.iar.com]
This document is targeted to IAR stack plugin. Although this did not work for the MCU I debugged.
Stack and Heap [www.iar.com]
What's stack, heap, methods explained briefly how to calculate stack usage in IAR. Methods applicable for other IDE's as well, not limited to IAR only.
Stack use in C and C++ [www.keil.com]
How to obtain stack usage in KEIL using callgraph (option --callgraph).
Here's callgraph output which I found on the internet, not needed to share mine:
Keil callgraph - an example [ftp.analog.com/pub/MicroConverter]
Using indirect calls (function pointers) make this method unreliable, same for IAR stack plugin, where it can be added #pragma calls, but what if an application using another library, that's too much changes to do, more simple approach is in a following paragraph presented, a filling memory for a stack with a pattern and show how low it gets.
KEIL stack initialize routine [www.keil.com/forum]
Stack initialization routine, which I only accustomed to Thumb-2. Here's the code used on Cortex-M0. Label __user_initial_stackheap is located in assembly file for your board. Just run your application for a while and check the memory window to obtain the lowest address of the last character of your pattern (in our case it's AA (char values)). Calculate the subtraction which gives your application stack usage.
__user_initial_stackheap
    LDR     R0, =Stack_Mem
    LDR     R1, =Stack_Size
    LDR     R2, =0xAAAAAAAA
fill
    STR     R2, [R0]
    ADDS    R0,#4
    SUBS    R1,#4
    BNE     fill
This also can be added in assembly file which is used in IAR or any other IDE, just replace Stack_Mem symbol (beginning of the stack) and Stack_Size (size of the stack).
Subscribe to:
Posts (Atom)